Back of House
Managing POS Users
Keeping your POS users up to date when team members join or leave is an important part of maintaining security operations. The exact process varies slightly depending on your installation type.
Site Master
Site
Adding Users
Follow these steps to add back of house users:
-
Click Add
You can also click Add New User from the front page Quick Links -
Enter the following user details, First Name | Middle Initial (optional) | Last Name | Description (optional)
-
Select the User Position
-
Select the Role Type
-
Front of House - will continue the setup for just front of house (point of sale terminal users only)
-
Back of House - will continue the setup for just back of house
-
Both - will continue the setup for both role types
 In this example, Both is selected. As you continue through the step by step wizard, you will be prompted to enter information for both role types. If only one role type is selected, the wizard will display only the steps relevant to that role
 -
-
Click Next
-
Select the required Back of House Roles
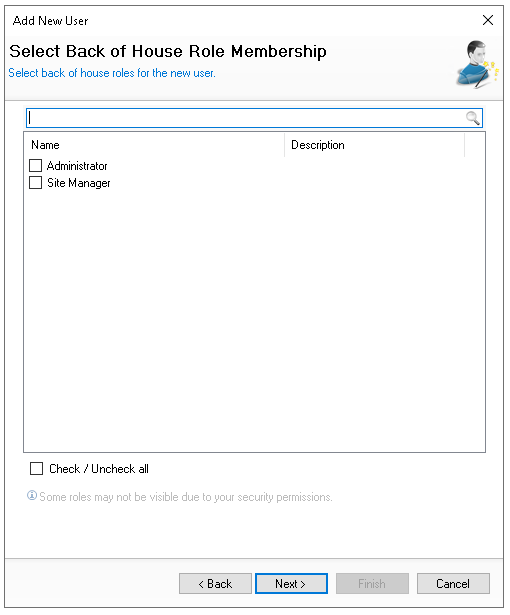 Depending on how roles are configured in your setup, a user can be assigned one or more roles
 -
Click Next
-
Enter the back of house login details
-
Username (update as required) - taken from the first name entered
-
New Password
-
Repeat Password
Passwords must following configured password policy, more information can be found by clicking 'Show password policy rules'
Zonal recommends always setting an initial password and then requiring the user to change / set their own password on login keeping the change password setting enabled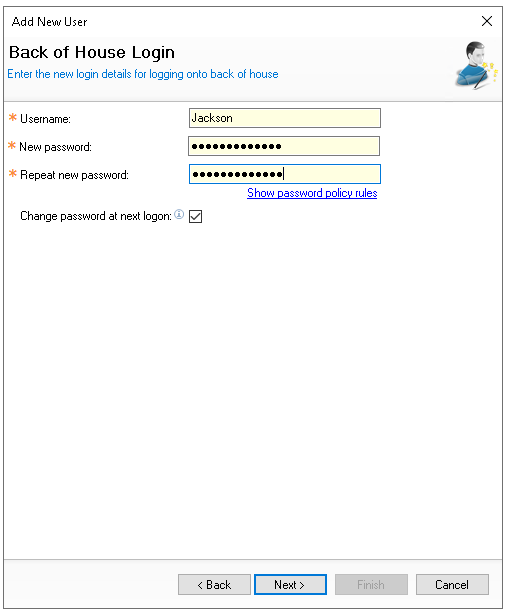
-
-
Click Next
-
Select the required Front of House Roles
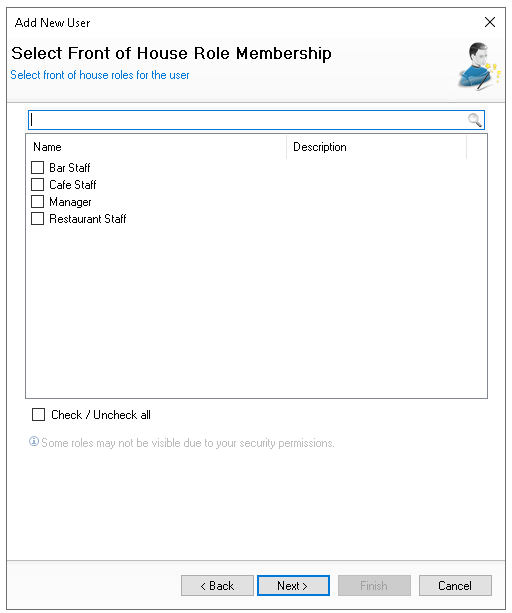
-
Click Next
-
Enter the front of house login details
-
Username (update as required) - taken from the first name entered and is displayed on the point of sale and printed materials
-
ESL - Identification of a Dallas Key or Card Swipe
-
Attach a Dallas Key to the reader | click Read
-
-
New PIN
4 digit PIN numbers are used to login to point of sale terminals, iServe, selected PIN Pads -
Repeat New PIN
Either a ESL or PIN number is required before being able to finish the setup
-
-
Click Finish
-
From the User Details screen the following updates can be made
-
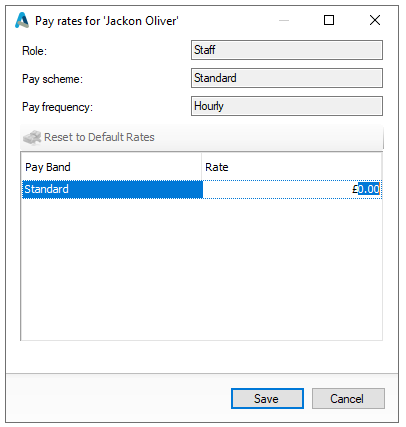
Change the Pay Scheme for assigned Back of House Roles
-
Change the Pay Rate if roles are configured for site overrides | click Pay Rates and set as required
-
Change the Default Terminal Role (if more than one back of house role was assigned)
-
Change other settings across User Details (or other tabs included within the setup)
-
-
Click Save
Editing Users
Follow these steps to edit users:
-
From the User List make a selection
-
Select an existing user
-
Enter a search filter
-
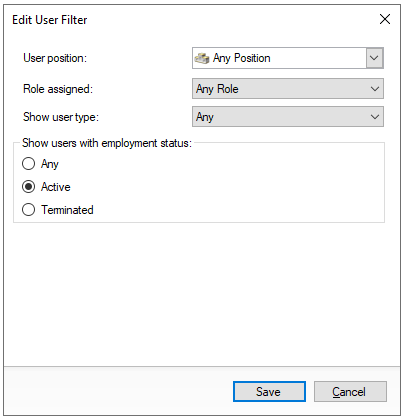
Click Edit Filter | make a selection | click Save
-
User Position
-
Role Assigned
-
User Type
-
Status
-
-
-
Update any User Details or other settings as required
-
Click Save
Terminating Users
Back of House Users
Follow these steps to terminate a back of house user:
-
From the User List make a selection
For help in making a selection review the Editing Users section above -
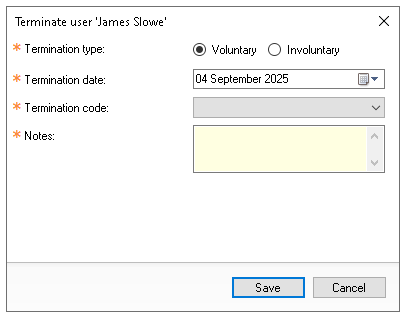
Click Terminate
-
Select Yes to confirm the termination
-
Select the required termination information
-
Type
-
Date
-
Code
-
Notes
-
-
Click Save
Front of House Users
Follow these steps to terminate a front of house user:
-
From the User List make a selection
For help in making a selection review the Editing Users section above -
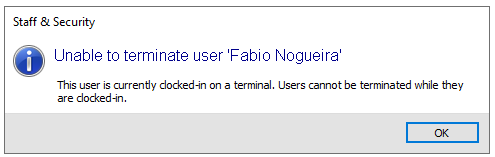
Click Terminate
-
Confirm the Terminate User option by selecting Yes
If the employee is still clocked in you will be prevented from terminating the employee and any activate accounts must be closed or transferred and a clock out completed
-
Select the required termination information
-
Type
-
Date
-
Code
-
Notes
-
-
Click Save
Reinstating Users
When a user has been terminated it is possible to reinstate them either to correct a mistake or where someone has returned to the business.
Follow these steps to reinstate a user:
-
Click Edit Filter
-
Select Employment Status Terminated | make a other selections as required | click Save
-
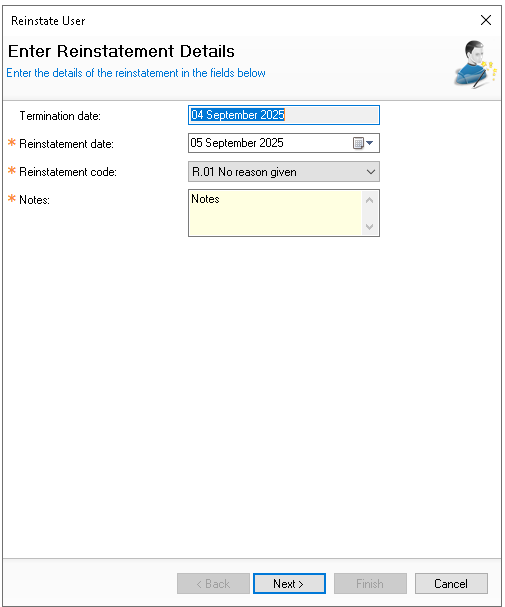
Click Reinstate User
-
Select the required reinstate information
-
Reinstatement Date
-
Reinstatement Code
-
Notes
-
-
Click Next
-
Reconfirm User Details
-
Reconfirm Roles for both Back / Front of House (as they were previously set)
-
Enter any Login Details
-
Click Finish
Bookings (Deposits) Tasks
In Aztec deposits are referred to as 'Bookings'. Managing bookings (deposits) ensures you stay in control of those due today and quickly identify any that have become overdue, helping you maintain your deposit ledger.
1 Bookings Due Today
There are two easy ways to see a list of bookings due today:
Option A - From Reports run the Bookings Due Report for Today, this will display the booking information and deposit values
Bookings Reports
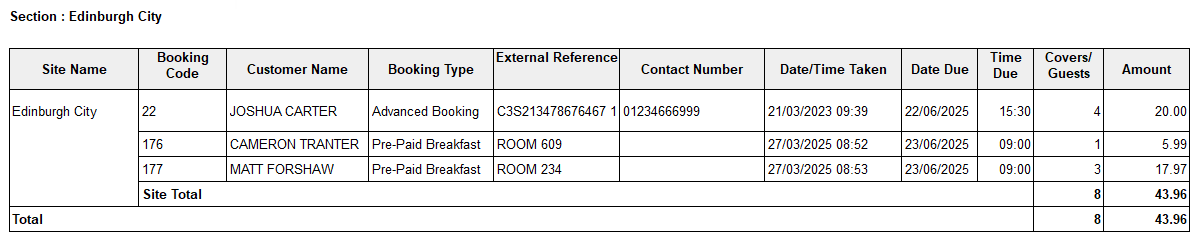
The following reports are available for bookings:
Bookings Due
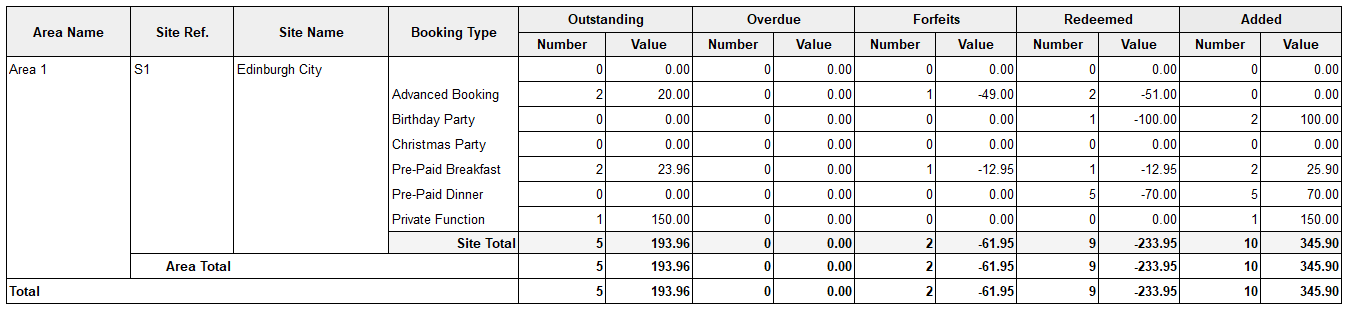
Summary of bookings due by date range.
Bookings Audit
Summary of all bookings actions by date range.
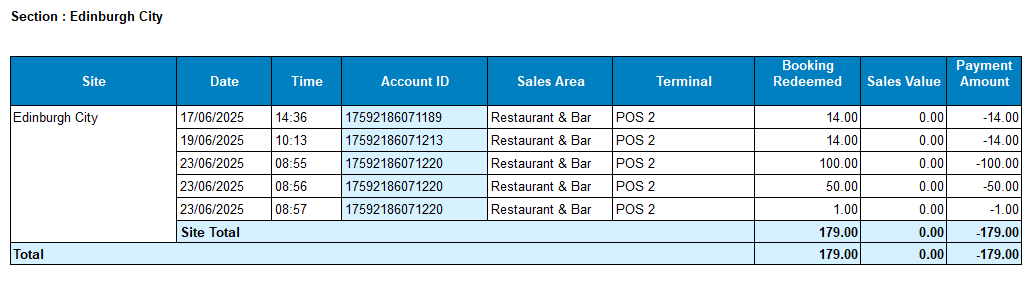
Bookings Redeemed without Equivalent Sales Value
List of redeemed bookings where no sales exist, with option to drill through to audit transaction report and view receipt.
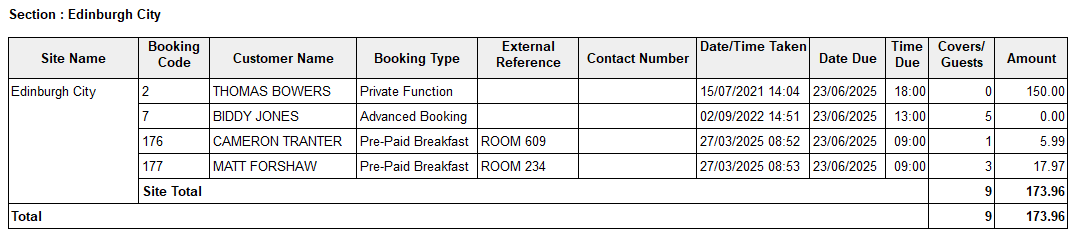
Booking Site Summary
Summary of status by date range, value and quantity.
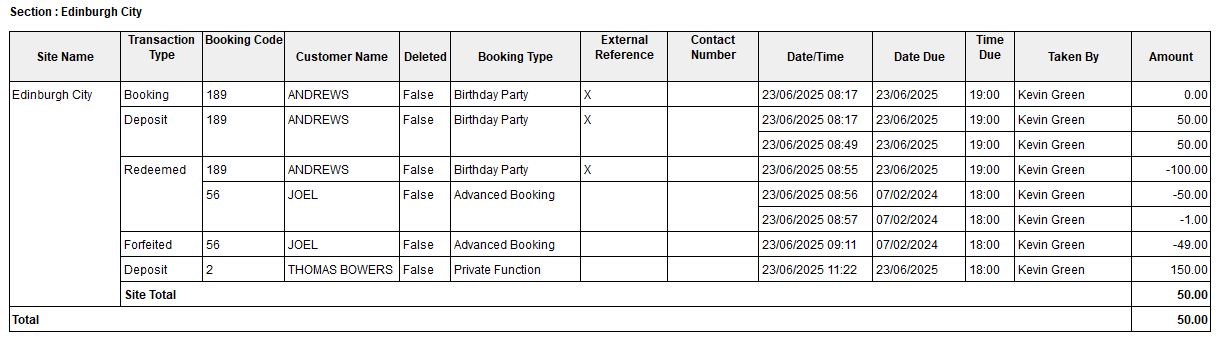
Bookings Transaction
Transaction views of bookings received, redeemed and forfeited by date range.
![]()
Completed Bookings
List of completed bookings over by date range.
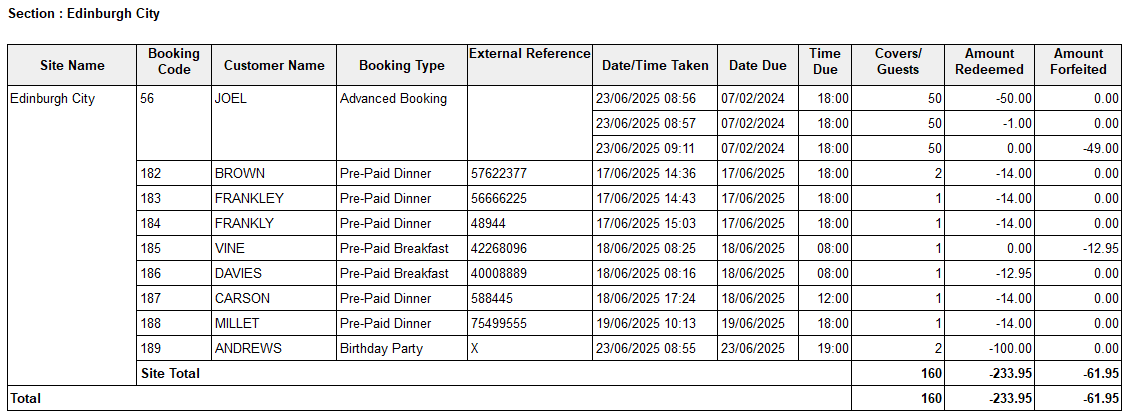
Forfeit Bookings
Summary list of all bookings forfeited by date range.

Outstanding Bookings
Summary list of all outstanding bookings by date range.
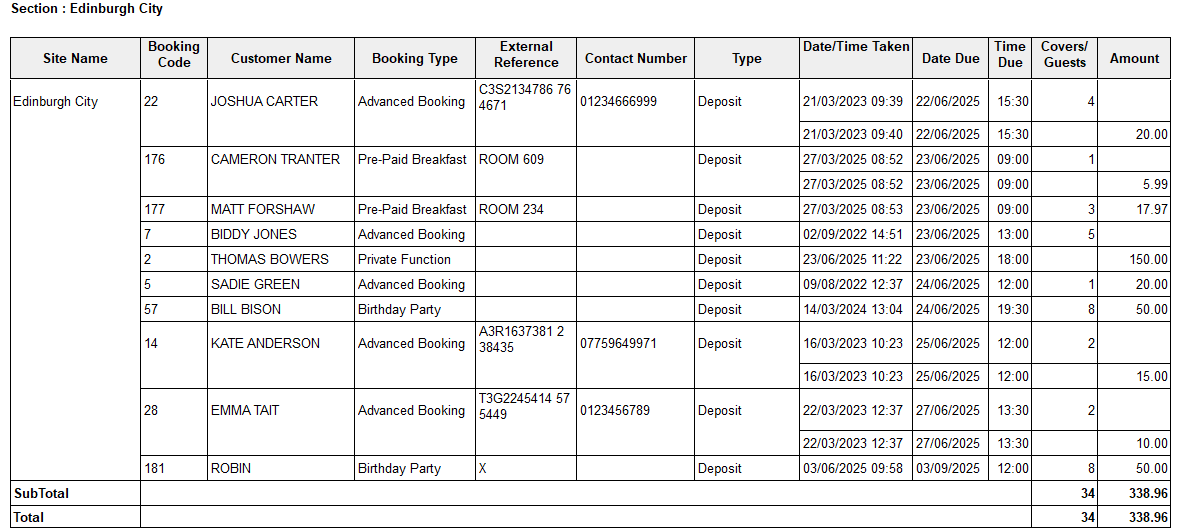
Overdue Bookings
Summary list of all overdue bookings by due date.
Option B - On the point of sale terminal when performing a redemption it will default to today showing all of the bookings due today, you can find out more about redemptions here in our front of house guide
2 Overdue Bookings
Any overdue bookings should be actioned, there are two options to view those overdue:
Option A - From Reports run the Overdue Bookings Report
Option B - From Bookings → select the Status Filter 'Open' and the Due Filter 'Before Today'
Actions
Sales Ledger Tasks
For sites running sales ledger accounts, daily tasks cover all aspects of account management from creating new accounts and processing settlements, to issuing invoices and statements.
1 Managing Accounts
Depending on the setup of your system new accounts might need to be added and assigned to the correct account class.
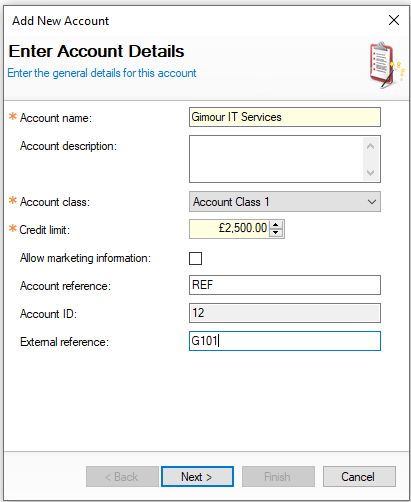
Adding Accounts
Follow these steps to add accounts:
-
Click Add
-
Enter the Account Name and Description (optional)
-
Select the Account Class
-
Set the required Credit Limit
The credit limit is automatically populated based on the account class setting. It can be reduced if required, but it cannot be increased beyond the class limit -
Set the following other options
-
Account Reference (only displayed if enabled for the site)
-
Allow Marketing Information (not require / redundant setting)
-
External Reference
-
-
Click Next
-
Enter any required Billing Details (Address Line 1 and Postcode are mandatory fields)
Billing details will be displayed on invoices and statements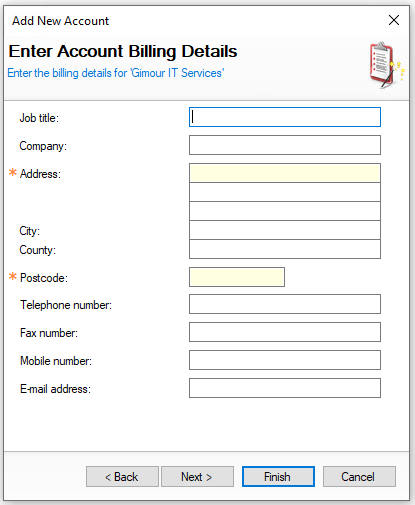
-
Either click Finish to complete the setup or to add Contacts click Next
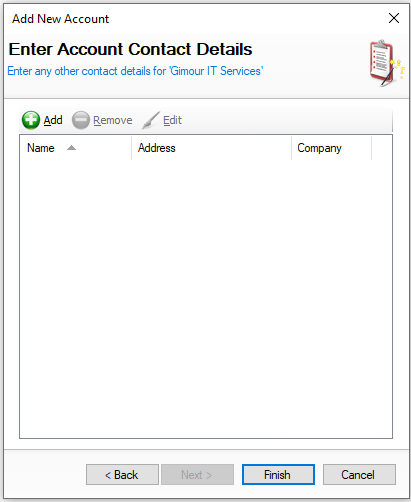
-
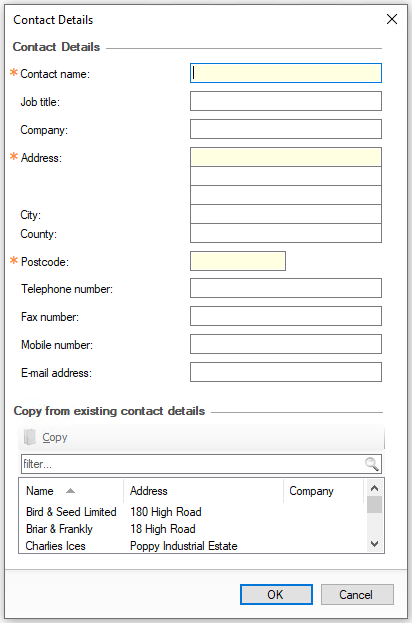
Click Add | enter the required Contact Details | click OK
-
Click Finish
Adding Accounts with Start / End Dates
If an account class is configured with start and end dates, additional options are displayed when creating an account. These date and time bound accounts are particularly useful for one off events or functions, as they are manually closed once payment has been taken and are no longer required. The end date and time also prevent any further charges being added beyond the specified period.
Follow these steps to add accounts with start / end dates:
-
Click Add
-
Enter the Account Name and Description (optional)
-
Select the Account Class
-
Set the required Credit Limit
If selecting a class that is configured with start and end dates this will be automatically populated on to the account details setup -
Set the following other options
-
Account Reference (only displayed if enabled for the site)
-
Allow Marketing Information (not require / redundant setting)
-
External Reference
-
Start Date - set the start date of the account
-
End Date - set the end date of the account
-
End Time - set the end time of the account
Once the end date and time has been reach it will not be possible for point of sale operators to charge any further amounts to the account, if this is required the time or date should be extended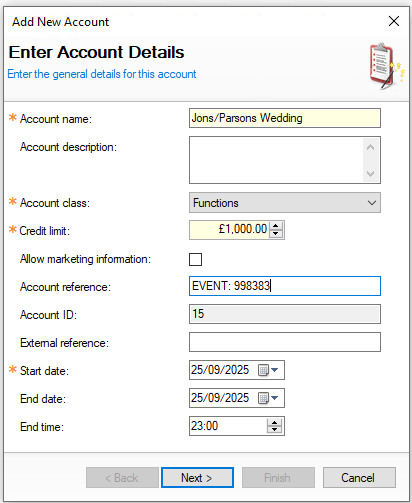
-
-
Click Next | continue the setup of the account
Other Account Options
Swipe Cards
If enabled, swipe cards can be linked to an account, allowing the card to be used at the point of sale terminal to quickly locate and charge the correct account.
Follow these steps to assign swipe cards to accounts:
-
Select the Account
-
Click Swipe Cards | click Add
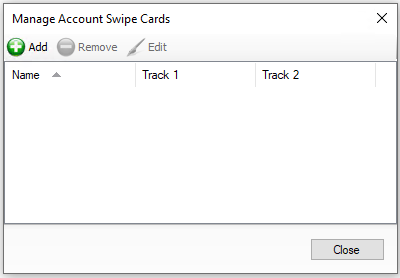
-
Click Add
-
Enter the Card Holder Name and Card Number
If the card number runs on track 2 enable this setting and add the card number to the track 2 card number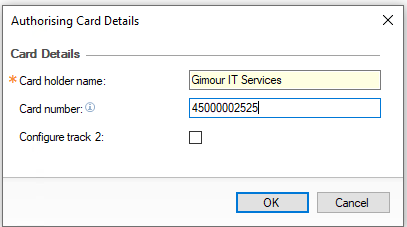
-
Click OK | and click Close on the Card List
Accounts on Hold
Accounts may automatically be put on hold if their balance is not paid within the expected time period, this prevents additional charges being made to the account when outstanding balances are due.
-
An account will be put on hold automatically if there is an over due balance
-
An account can be unheld for additional charges to be made to the account, this will remain only unheld (by deselecting the check box) until the configured system business date change, if this was set to 03:00 then after that time the account will be return back to being on hold
-
An account can be put on to hold manually be selecting
-
Selecting On Hold
-
Clicking Save
-
Account Details - Status
When there is account activity this is displayed within the 'Account Status' section.
-
Next Statement Due Date - based on the rules configured on the Account Class will determine when statements are due
-
Current Balance - the balance of the account
-
Status Chart of values
-
Red - Overdue
-
Orange - Settlements Due to Today
-
Green - Settlements Not Yet Due
-
Blue - Still to be Invoiced
When an invoice has been issued this will move to green, 'settlements not yet due'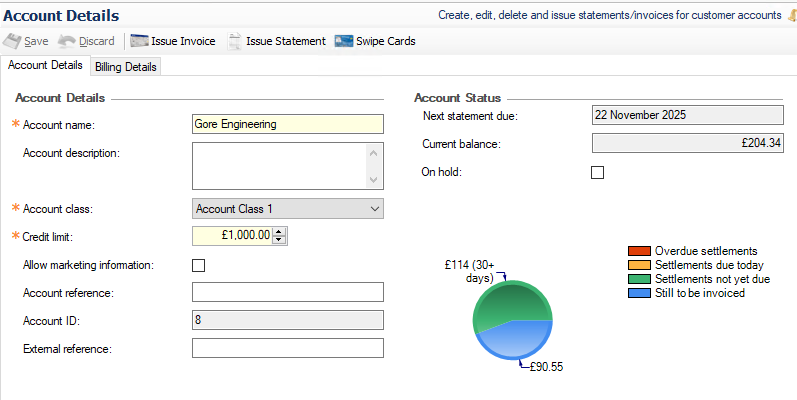
-
Closing Accounts
Accounts that have account classes that enable start / end dates can be closed to remove them from the open accounts list.
Follow these steps to close accounts:
-
Select an Account
-
Click Close
-
Click Yes to confirm the account closure
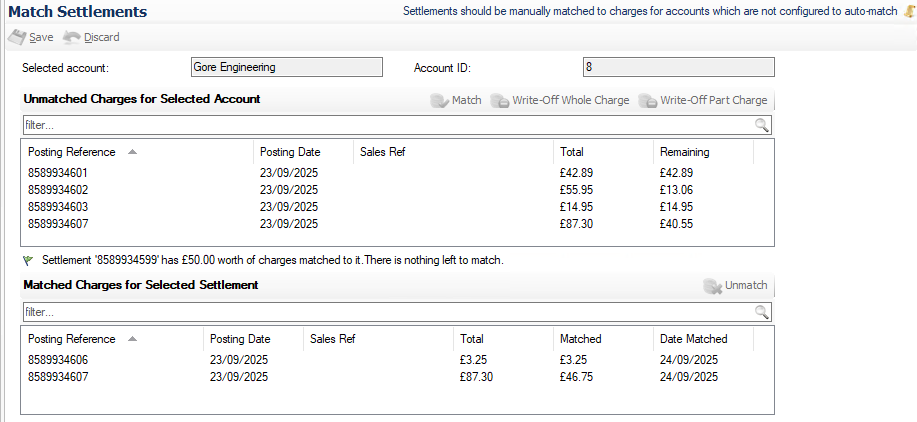
2 Managing Settlements & Matching
Settlements
Settlements to accounts are performed through the point of sale terminal, you can find out more information on settlements here in our front of house guide.
Matching
Depending on the settings within the account class settlements can automatically match to payments, alternatively if manual matching is required this means a settlement is then matched to a specific charges on an account.
Matching Settlements
When a settlement has been on the point of sale to an account that requires matching will be automatically displayed in the match settlements screen with the views selected of Unmatched and Partially Matched.
-
Settlements List by Account
-
Filters
-
Unmatched Charges for a Selected Account
-
Matched Charge for Selected Account
-
When an unmatched charge is selected and matched it will move into this section
-
-
Written Off Charges
-
When an unmatched charge is selected and written off it will move into this section
-
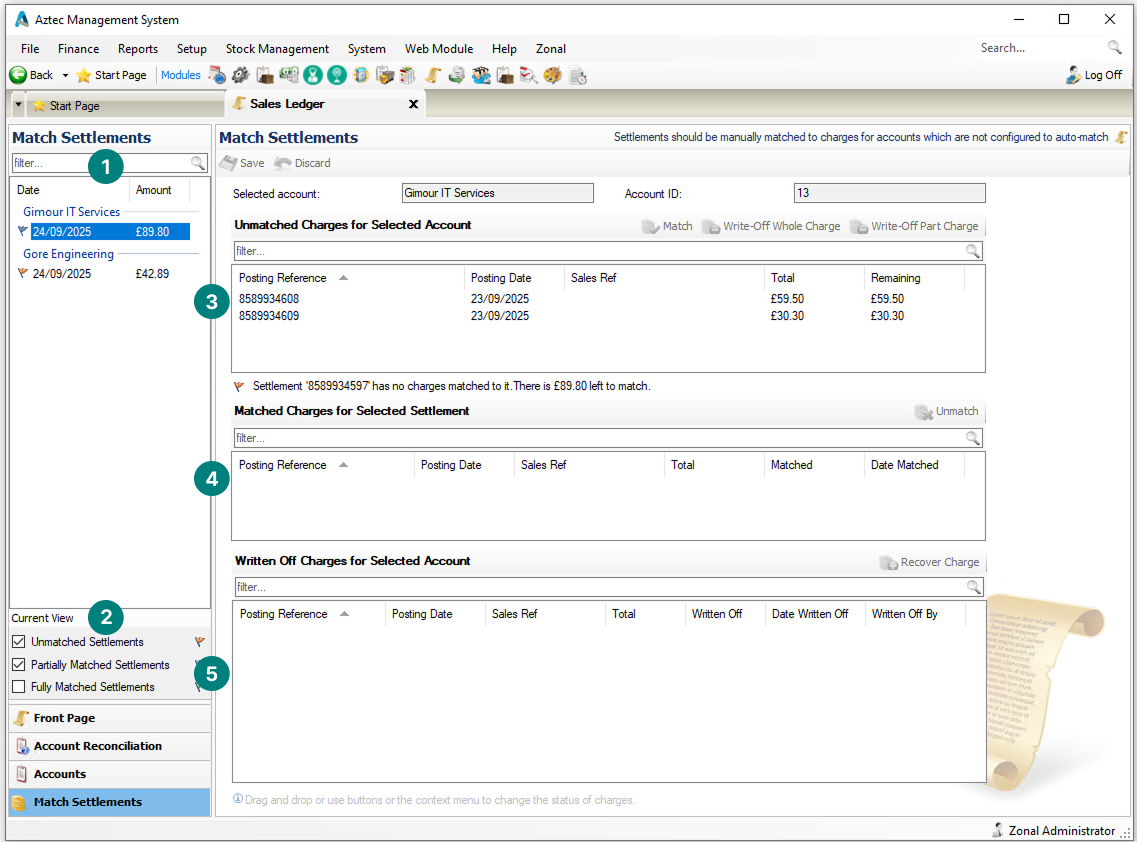
Follow these steps to match a settlement:
-
Select the Unmatched Settlement from the Match Settlements list
There could be multiple settlement values showing per account -
Select the required Unmatched Charges for the account
-
Clicking a row
-
Shift+Click to select multiple rows
A settlement can be matched to multiple charges either in bulk or individually
-
-
Click Match or Drag & Drop the charges into the Matched Section
The selected charges will move into the matched section, if a mistake has been made using the Umatch option will move the charge back to the unmatched section
-
Click Save
Additional Information
Settlement values might not always match those of the charges for an account, in this case partial matching can occur where a charge is either fully matched leaving an outstanding settlement value or the opposite where the settlement was not enough to cover the full charge amount.
Example
A settlement of £50.00 was made and matched to 2 charges:
-
£3.25 - fully settled
-
£87.30 - partially settled leaving a remaining balance of £40.55
A previous settlement was also matched to the charge of £55.95 leaving a remaining value of £13.06 still to be settled
Write Off Charges
During matching charges can be written off either because:
-
The outstanding balance will not be paid
-
The settled amount is not enough to cover the remaining amount due
Follow these steps to write off charges:
-
Select the Unmatched Settlement from the Match Settlements list or select the filter Fully Matched
-
Select an Unmatched Charge
-
Select the required Write Off option
-
Write Off Whole Charge - the full charge will move to the write off section
-
Write Off Part Charge - enter the amount to be written Off
-
-
Click Save
3 Issuing Invoices & Statements
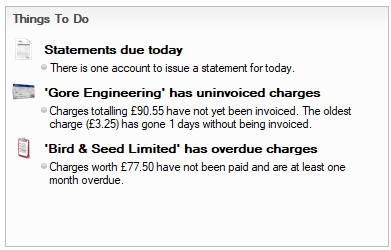
Depending on your organisation's procedures, invoices and statements may be managed centrally. If these tasks are handled onsite, any uninvoiced charges added to an account will appear as a prompt on the Things To Do list, ensuring nothing is missed.
Issuing Invoices
When a charge has been made from the point of sale to the account it will automatically show on the 'Things to Do List' with accounts that have uninvoiced charges
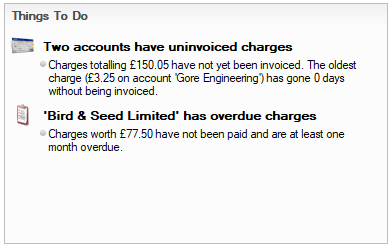
There are several options to issuing invoices:
Option 1
-
Click the Information Message within the Things to Do List
-
Select the Account with values in the 'To be Invoiced' column
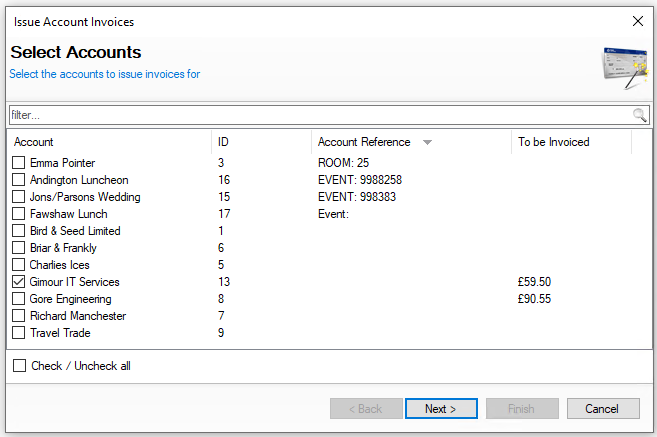
-
Click Next
-
Select the required Postings to be printed on the invoice
Multiple postings can be included on an invoice or alternatively separate invoices can be issued per posting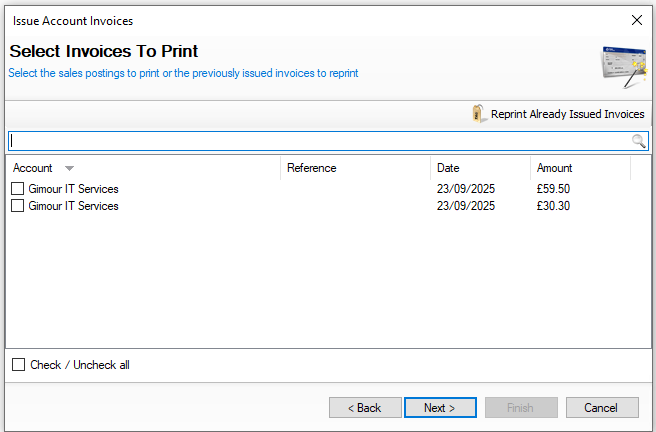
-
Click Next
-
Confirm to proceed by clicking Finish
-
Print or Export the Statement generated from Reports as required
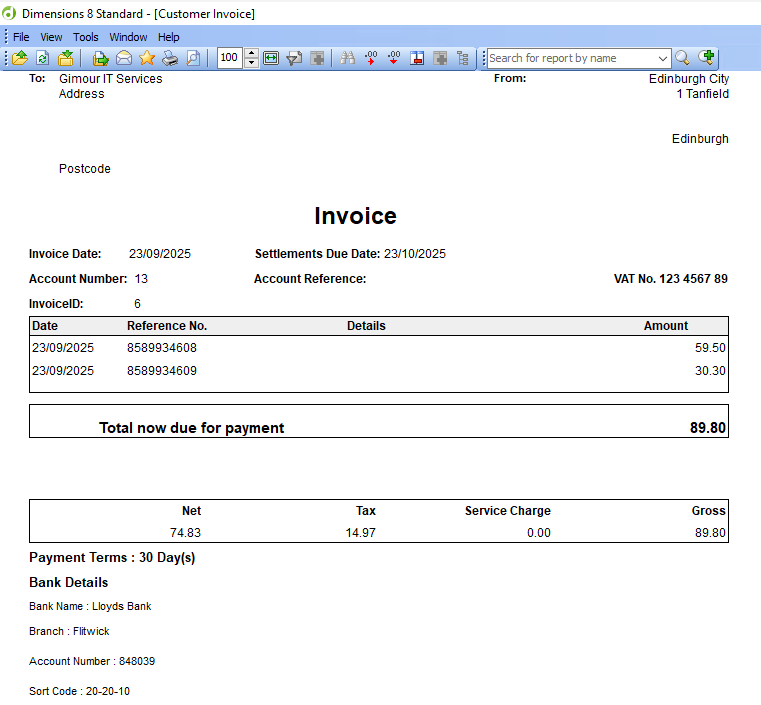 If there is a reference entered as part of the charging process on the point of sale this will be displayed under the invoice 'Details'
Option 2
-
Select 'Issue Account Invoices' from the Quick Links on the Front Page
-
Follow the same process to issue as option 1
Option 3
-
Select an Account
-
Click Issue Invoice
-
Follow the same process as option 1, from step 4
Reprinting Invoices
Once an invoice has been issued it can be reprinted if needed.
Follow these steps to reprint an invoice:
-
Select an Account
-
Click Issue Invoice
-
Click Reprint Already Issued Invoices
-
Select the required invoices to be printed | click Next | click Finish
Issuing Statements
When a statement is due it will automatically show on 'Things to Do List' either for the current day or if statements are overdue to be issued.
There are several options to issuing statements:
Option 1
-
Click the Information Message within the Things to Do List
-
The accounts requiring statements will be preselected | click Next
-
Confirm the selected statement Start and End Dates | click Next
-
Click Finish
Option 2
-
Select 'Issue Account Statements' from the Quick Links on the Front Page
-
Follow the same process to issue as option 1
Option 3
-
Select an Account
-
Click Issue Statement
-
Follow the same process as option 1 from step 3
Line Checks
Line Checks provide an efficient way to monitor key products throughout a stock period, helping you stay on top of items that previously showed variances or require regular attention. Depending on your system configuration, daily mandatory checks can be set up, prompting you each day via the Things to Do List to complete the required line checks.
Performing Line Checks
Follow these steps to perform a line check:
-
Click Do a Line Check
-
Select the required Product Division | click Next
-
Apply filters or search for the required products
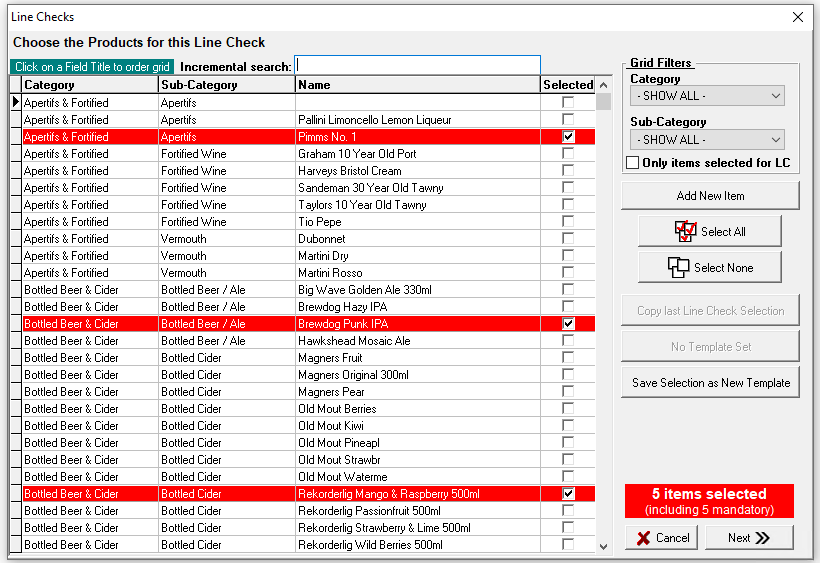
Select the required products by setting the Selected check box
Any products displayed in red are those that are defined as the required mandatory line check products, additional items can be added as required -
Click Next | if required click Yes to print the Count Sheet
-
Enter the counted values for the selected items in the Line Check Audit
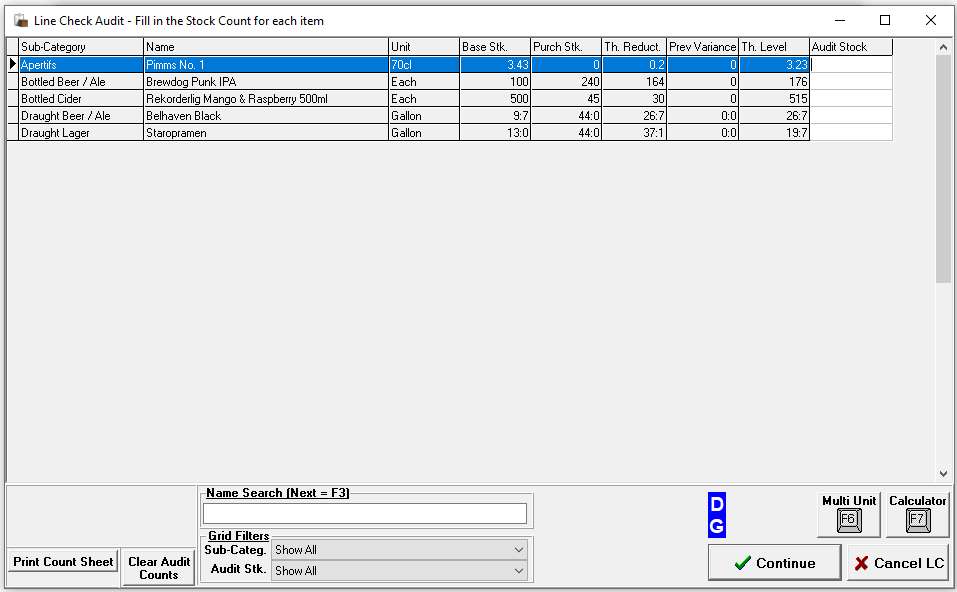
-
Click Continue
-
Review the Loss / Gain Report to verify the results for the line check
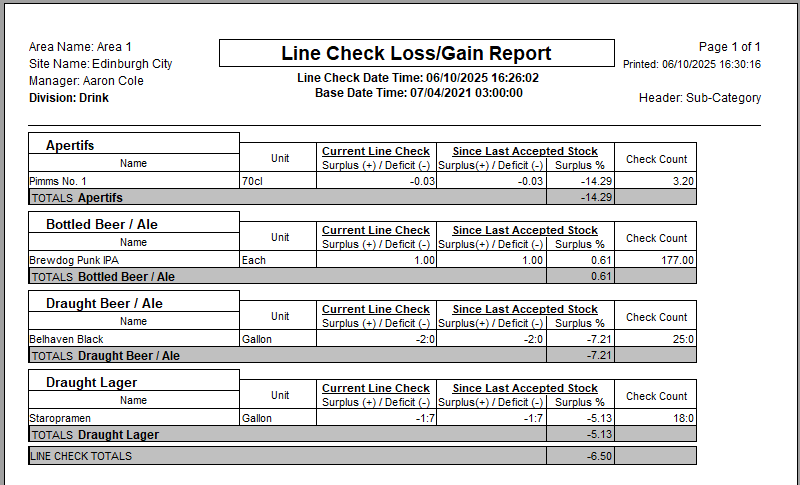 This report will give an overview of any losses or gains on the this line check allowing further monitoring or additional extra checks to made as required
 -
Click Close | click Yes to save the line check and exit
-
Enter any relevant Notes if required | click Done
Viewing Line Check Reports
Follow these steps to view past line check reports:
-
Click View Line Check Reports
-
Select a check from the list | click View Report
The Loss / Gain Report will be displayed
Line Check Templates
When performing Line Checks, templates can be created and saved for future use, making it quicker and easier to select the required items by simply choosing a saved template.
Follow these steps to create a template:
-
Click Do a Line Check
-
Select the required Product Division | click Next
-
Apply filters or search for the required products
Select the required products by setting the Selected check box
-
Click Save Selection as New Template
-
Enter a Template Name and Comment (optional)
-
Click Save Template
Using Template in a Line Check
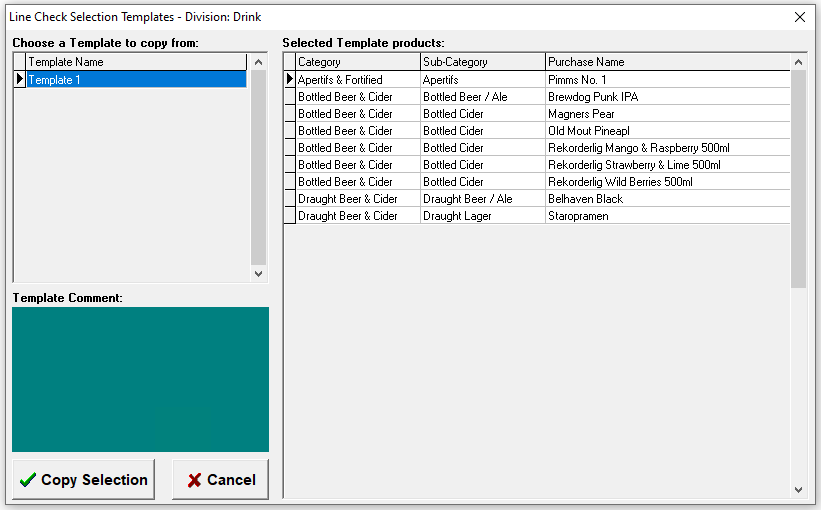
When performing a line check follow these steps to use the template:
-
Click Copy from Template
-
Select the required Template
-
Click Copy Selection
All products from the template will be selected in the product selection screen, additional products can be added or those already selected from the template can be deselected as needed
Proceed with the line check
Managing Templates
Follow these steps to manage templates:
-
Click Manage LC Templates
-
Select an existing Template
-
Update the Name or Comment as required
or
Click Delete | confirm Yes to delete the template
Confirming Clock Times
If you are using the Time & Attendance module and your team are clocking in and out at the point of sale terminal, confirming clocking times each day will make end of week sign off a much quicker task. Verifying times as you go ensures you are accurately recording the hours you will be paying your team.
Confirming Times
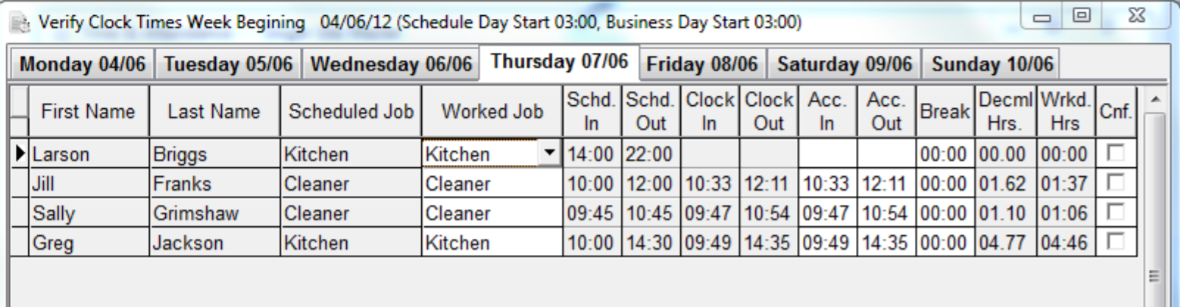
For each employee clocked in and out an entry will be populated into the verify clock times screen, each entry is required to be confirmed so that at the end of the week the payroll can be signed off ready for processing.
Follow these steps to confirm times:
-
Select the required Week to complete the clock times | click OK
-
Select the required Day tab to confirm
All clocked times for the selected day will be displayed with the follow information
-
First and Last Name
-
Scheduled Job - if there was a scheduled entry the job will be displayed
-
Worked Job - will display the job the employee clocked in as
-
Scheduled In / Out - the time set when creating the schedule
-
Clock In / Out - the times recorded from the employee clocking in and out of the point of sale terminal
-
Actual In / Out - times are populated from clocked times and can be either
-
Left as per the clock times
-
Updated to times that the employee will be paid, for example in some organisation these are rounded up or down to the nearest 15 minutes
-
-
Breaks - any breaks taken through employee break function on the point of sale will be displayed
-
-
Set the required Actual In / Out Times as required
-
Confirm the required Break Times, if this requires adjustment 'double click' the break time and Insert or Delete break times as required
-
Click Confirm check box, complete for all entries
-
Click Close
All entries for each day must be confirmed before the payroll can be signed off
Managing Breaks
When verifying times if breaks are also recorded these will be automatically populated into the breaks section,
Other Options
Additional options can also be completed within the verify section.
-
Insert - enables extra missing shifts to be added
-
Click Insert | select the Employee | select the Worked Job | enter Start and End Times | click OK
-
-
Add Extra Payment - for an existing entry extra payments can be added
-
Select an Employee row | click Add Extra Payment | click Add | select the required options | click OK
-
-
Delete - any employees that did not work their schedule can be removed
-
Select an Employee row | click Delete | click OK to confirm deletion
-
Finance Activities
Depending on your organisation’s financial procedures, you may be required to complete a range of tasks within the Finance module to reconcile and audit all monies held onsite.
Find out more about some of the most common tasks you might need to complete throughout the day:
1 Counts 
You can manage the daily count reconciliation of monies held within a safe, drawer insert, money belt and ATM cassette by performing 'Counts' on these money repositories.
Follow these steps to complete a safe count:
🔑 Login to Aztec
Get started by logging into Aztec and open the Finance module
🧮 Counts
Select Cash Management → Counts → click Perform Count
💰 Select Safe
Select the Safe (which is to be counted) → click Next
📅 Select Date
Select the Count Date → click Next
❗ You only have to choose a date if you work on a weekly sign off
💷 Enter The Count
Enter the Amount Counted → click Finish
2 Floats
Floats enable you to manage the money contained with a drawer insert, money belt and ATM cassette.
Follow these steps to manage insert floats:
🔑 Login to Aztec
Get started by logging into Aztec and open the Finance module
🏷️ Floats
Select Cash Management → Floats → click Set Float
💰 Select Drawer Insert
Select the Drawer Insert (to be floated) → click Next
💰 Select Safe
Select the Safe (from which the money was taken) → click Next
❗ This step is only shown if you have more than one safe
📅 Select Date
Select the Float Date → click Next
❗ You only have to choose a date if you work on a weekly sign off
⌨️ Enter Reference
Enter the Float Reference → click Next
❗️ You only have to enter a reference if this is configured for your operation
💷 Set The Float Amount
Enter or Edit the Float Value → click Finish
❗️ You can also set the value to zero which will return any monies to the safe
3 Banking Collection
If you performed a banking the previous evening often this money will be collected or taken to the bank, using a collection records this money has now left the site.
Follow these steps to complete a collection:
🔑 Login to Aztec
Get started by logging into Aztec and open the Finance module
🏦 Banking Collection
Select Admin → Banking Collection → click Add Banking Collection
💰 Select Bankings
Select the Bankings which are being collected (or taken to the bank) → click Next
❗ You maybe prevented from continuing if you have selected bankings that take you over the single collection limit
⌨️ Enter Reference
Enter the Banking Collection Reference → click Finish
❗️ This is usually the unique reference of the banking collection bag
4 Declarations
At the end of each session you might be required to declare your terminals, inserts or money belts, this reconciles what was expected vs what was actually taken and then counted, this money will be transferred into your safe. If you used any of the cash during the day for a miscellaneous expense (petty cash) count this receipt as cash and then action in step 5.
Follow these steps to complete a declaration:
🔑 Login to Aztec
Get started by logging into Aztec and open the Finance module
📲 Declarations
Select Cash Management → Declarations → click Declare
❗ You might be required to complete a sign off before being able to complete a declaration
📱 Select Terminal / Insert / Employee
Select the required Terminal, Insert or Employee to declare→ click Next
❗ Depending on your configuration you might only see selected options to declare
❗ Outstanding Skims must be completed before being able to complete a declaration
💰 Select Safe
Select the Safe (where declared the money will be added to) → click Next
❗ This step is only shown if you have more than one safe
💷 Enter The Declared Count
Enter the Amount Counted → click Finish
❗ When declaring inserts remember to include the original float value in the money counted
❗ You may have a blind declaration (where you cannot see the expected amount) and might be prompted to re-enter the counted values if they are not within set tolerance
5 Miscellaneous Expenses
Miscellaneous expenses allow you to reconcile petty cash spent on sundry items. Recording an expense will reduce the balance of money held in the onsite safe.
Follow these steps to add an expense:
🔑 Login to Aztec
Get started by logging into Aztec and open the Finance module
⬅️ Misc Expense
Select Cash Management → Misc Expense → click Add Misc Expense
💰 Select Safe
Select the Safe (from which the money was taken) → click Next
❗ This step is only shown if you have more than one safe
📅 Select Date
Select the Expense Date → click Next
❗ You only have to choose a date if you work on a weekly sign off
⌨️ Enter Expense Details
Enter the Expense Reference → select Expense Type → enter the Gross Amount → click Finish
❗️ You maybe permitted to edit the tax amount
❗️ If your expense receipt contains different 'Types' click Add Split and enter additional amounts
6 Banking
When all monies are reconciled money should be banked to reduce the overall cash onsite value back your normal house float levels.
Follow these steps to complete a banking:
🔑 Login to Aztec
Get started by logging into Aztec and open the Finance module
🏦 Banking
Select Cash Management → Banking → click Add Banking
💰 Select Safe
Select the Safe (where the money is been banked from) → click Next
❗ This step is only shown if you have more than one safe
📅 Select Date
Select the Banking Date → click Next
❗ You only have to choose a date if you work on a weekly sign off
🏦 Select Destination Bank
Select the Destination Bank (the bank where the money is being deposited) → click Next
❗ This step is only shown if you have a bank configured
⌨️ Enter Reference
Enter the Banking Reference → click Next
❗️ This is usually the unique reference from your paying in book / slip
💷 Enter Banking Amount
Enter the Amount Banked → click Finish
❗️ This is typically the Total Available to Bank Value minus the House Float
7 Sign Off
At the end of the day or week, you should complete the sign off process to finalise all figures and financial entries. During this step, you may be prompted to complete additional tasks before you can finish the sign off.
Follow these steps to complete a sign off:
🔑 Login to Aztec
Get started by logging into Aztec and open the Finance module
✅ Sign Off
Select Admin → Sign Off → click Sign Off Day or Week
❗️ You might be prevented from completing the sign off because not conditions have been completed
📲 Review Declaration Summary
Review the Declarations that have been completed over the sign off period → click Next
📲 Review Cash on Site Summary
Review the Cash on Site → click Next
⌨️ Enter Additional Comments
Add any optional Comments → click Finish
Other Activities
You may be required to complete additional activities within the Finance module. For more information, select an option below to view the relevant help topics.
Frequently Asked Questions
ATM
Before an ATM can be deployed a float value has to be assigned.
Floats
There are two reasons why you might not be able to see all of your floats (drawer inserts or money belts:
-
The drawer insert float has been assigned to a point of sale terminal and the terminal opened
-
The money belt float has been assigned to a front of house operator and their session started
-
The float was deactivated
Floats
If the value of a float for drawer insert, money belt or ATM is wrong you can update this to be the correct amount.
Safes
Money can be transferred between safes so that there is an accurate record of money in each safe.
Misc Expenses
Petty cash is recorded against a misc expense entry, recording the type and relevant values.
Declarations / Skims
If a skim is performed on a point of sale terminal or a money belt session using the Count in Office action, the skim entry must be recorded first. This ensures the system recognises how much money was removed before the declaration can be completed.
Floats
Drawer insert floats can be added as required.
Floats
Money belt floats can be added as requierd.
Floats
Drawer insert floats can be deactivated as required.
Safes
Safes are managed within the configuration section and enable you to add or remove as required.
Machines
Machines are managed within the configuration section and enable you to add or remove as required.
Floats
Money can be removed from a float by setting the float value to be 0.00, it will return the money back to the source safe.
Safes
Adjusting the balance of a safe can be performed by completing a count on the safe and setting the new value.
Money Belts
The easiest way to view active sessions is to view the declarations screen, the status of all money belts is displayed.
Reporting Activities
Aztec comes with a wide range of reports providing information and insight into your daily activities and operations across point of sale and back of house functions. To get you started, here are our recommended reports that help you understand what's been happening across the system.
To get started with reports read our general information section that helps understand how to work with the reporting application or navigating reports.
Sales Reports
Keeping on track with sales is important, our recommended sales reports provide insight into products, promotions and general sales data.
Finance Reports
Transaction Reports
The transaction reports provided detailed insight into each action carried about by employees using the point of sale terminal, from opening accounts and tables added sales and completing payments everything is captured.
Employee Reports
Other Useful Reporting Information
For more information, select an option below to view the relevant help topics.
Stock Takes
Depending on your organisation's stock policies, a weekly or monthly stock count of food and drink may be required. The Stocks module allows you to start a count, enter values, and review the results before accepting the stock when you are ready to proceed.
There are some slight variations on the count process depending on your setup, for more information view a guide based on your setup.
Standard Counts
The standard count allows you to count all stock on site and view your results without needing locations or holding zones to be setup.
New Stock
Step 1 of 4
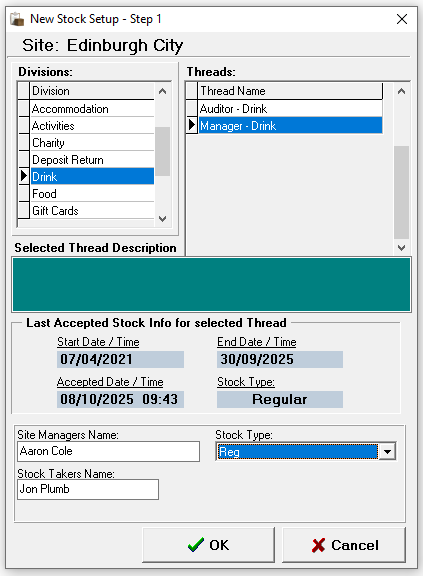
Follow these steps to start a new stock:
-
Select the required Product Division
-
Select the required Thread
Depending on the security settings applied to job roles you may only see one stock thread per division -
Enter the Site Managers Name, Stock Takers Name and select the required Stock Type
-
Click OK
-
Confirm the End Date
-
The start date will be the closing date of the last stock
-
The end date defaults to yesterday, a part day stock can be included for today by selecting the check box and setting a time
-
-
Click OK
-
Click Yes or No to print the Count Sheets as required
When selecting 'Yes' count sheets will be displayed on screen which can then be printed
-
Count sheets are displayed in either Category or Subcategory Order
-
Count sheets may contain additional fields and have large spacing depending on the organisations setup
-
-
From the Confirmation prompt select the required option
-
Yes - to proceed to entering the closing stock values
-
No - saves any figures (if already entered) and closes
If 'No' is selected selecting 'Current Stocks' from the main stocks menu will display this stock for selection -
Abort - cancels the stock
-
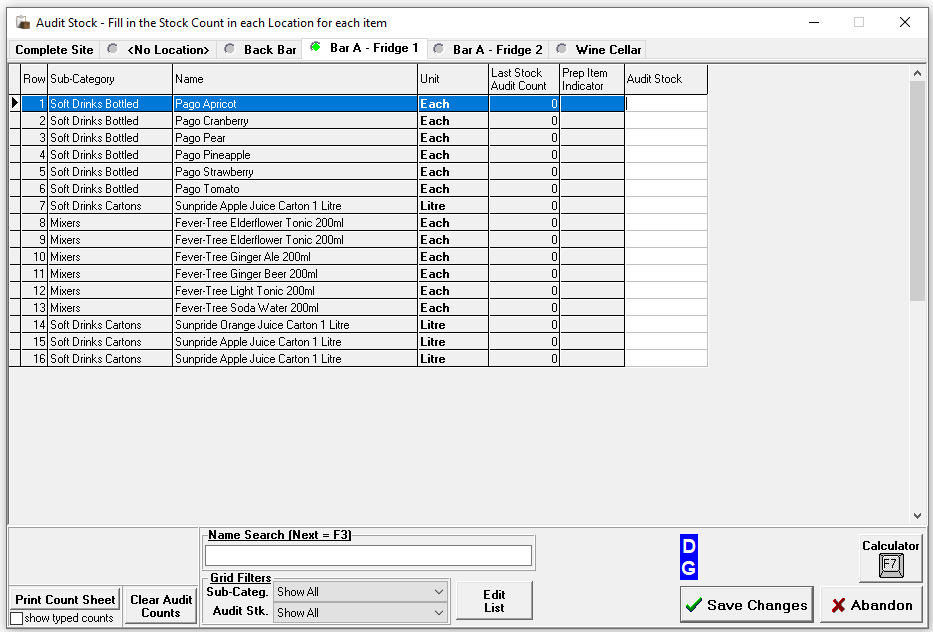
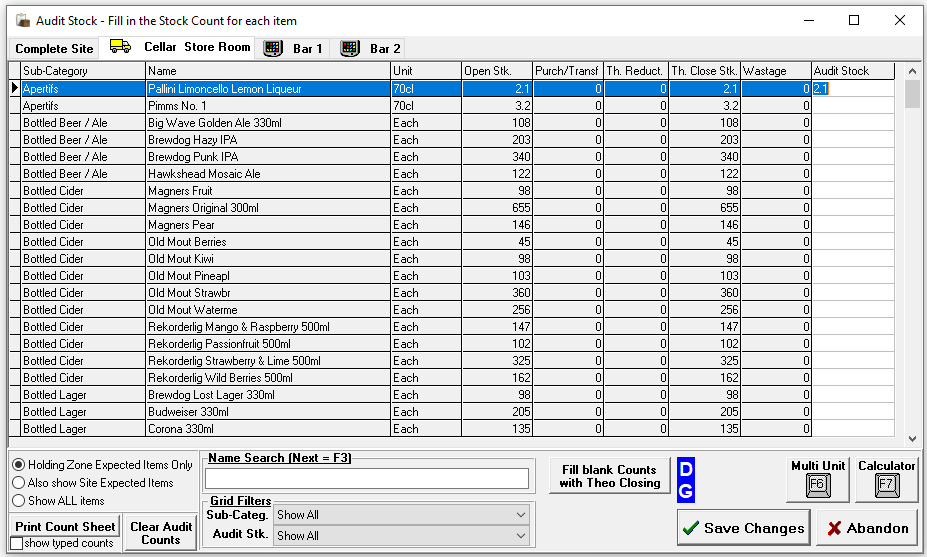
Entering Stock Counts
Step 2 of 4
The audit screen is displayed in the same order as the printed count sheets, allowing quick and efficient entry of the closing count figures.
Follow these steps to complete the stock count entry:
-
Enter the counted value into the Audit Stock Column
-
The count value should be representative of the Unit column
-
Two decimal places can be entered
-
All expected items must have an entry a in the audit stock column, if there is no stock an entry of 0 must be added
-
Any products that have a 'minus' theoretical closing stock value must be entered either as a positive or 0 value entry
Additional information and options in the audit stock screen-
Th. Closing Stk column on the grid might not be displayed for all threads
-
Fill Blank Counts with Theo Closing button might not be displayed for all threads
-
Clicking will enabled the theoretical closing values to be automatically added to the Audit Stock column
-
-
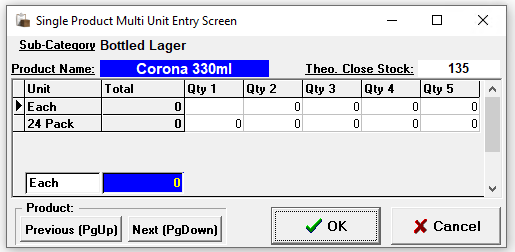
Clicking Multi Unit will enable multiple count entries to be added, if there are different purchase unit sizes (vs stock unit) these can be also entered
-
Pressing <Page Up> or <Page Down> on the keyboard will allow navigation to the next or previous products
-
-
Making selections from the Grid Filters can help show a smaller list selection
-
Category or Subcategory
-
Audit Stk - No Audit Entry | Audit Entry = 0 | No Audit Entry or Entry = 0
-
-
Name Search enables a search by product name
-
Show Expected Items Only is selected by default - this option shows all expected products that were either
-
Included in the last stock count and or had stock movement either by Sales | Waste | Delivery | Transfer
If a product is missing from the list that has been found select Show ALL Items and populate the count for the product
-
-
Clear Audit Counts will remove all entries from the Audit Stock column
-
Print Count Sheets will re-print the count sheets, selecting show typed counts will add the entries from the Audit Stock column on to the printed sheets
-
-
Click Save Changes to proceed
To proceed to getting the initial stock result all entries must be completed in the Audit Stock column, if this not completed the stock result cannot be accurately calculated and the stock finally accepted -
If prompted enter Nominal Prices for those products without one, the rules for population of this prompt are as follows
-
Use the tariff price for this product as currently set on the point of sale. This will only be available for Standard Line products where the ingredient is the same as the priced sold item
-
Use the price as entered by the last auditor for this product (if any)
-
If none of the above rules provide a price the field will be left empty for the auditor to populate
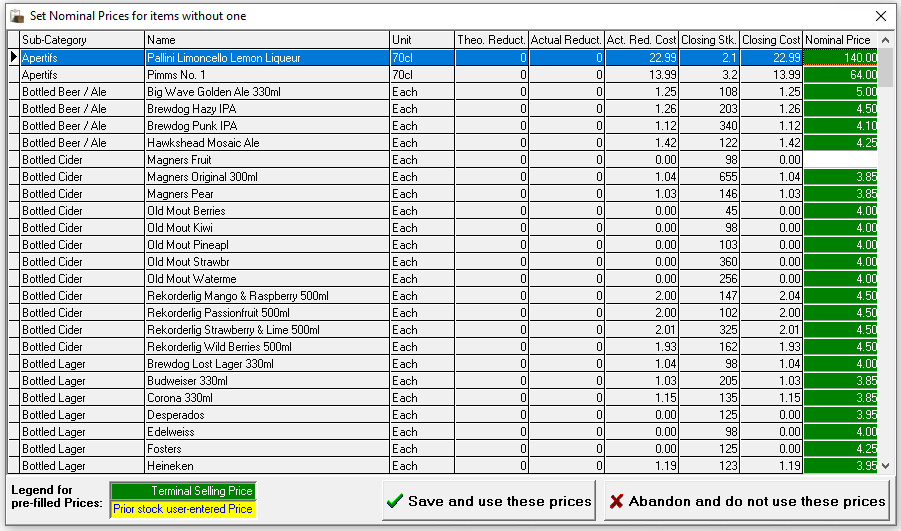
-
-
Click Save and Use these Prices
-
If prompted enter any Miscellaneous Stock Figures
-
Allowances enable a reason and cash value to be entered
-
Notes enable additional information to be added which will be displayed on stock reports
-
-
Click Save Changes & Exist
-
The Current Stocks list will be displayed if the stock is displayed as stage 'Completed' the stock is finalised and can be reviewed
Reviewing
Step 3 of 4
Once a stock take has been completed, the results should be reviewed and checked to identify and correct any obvious errors, miscounts or missing deliveries.
-
Use the Loss / Gain Report to check for large surpluses or deficits which could be as a result of
-
Miscounting stock
-
Incorrect typed on the entry of the closing count figure
-
Missing waste entry
-
Missing delivery entry
-
Cross sales on the point of sale where 'Product A' has been sold instead of 'Product B'
-
Incorrect recipes for ingredient reduction
-
Transfers to other sites were not completed / or accepted by the receiving site
-
If any updates to the above have been made the stock must be re-calculated in order to generate new results:
-
Select the Current Stock | click Edit Audit | either update any counts and / or click Save Changes (which will complete the re-calculation)
-
Check the results, if you the results are now as expected the stock can be accepted
Accepting
Step 4 of 4
When the stock has been reviewed a stock should be accepted which will close it and move it into the accepted stocks section.
-
Select the Current Stock | click Accept Stock | click OK to confirm the acceptance
Counts by Location
Locations can speed up the counting process by grouping all products within a specific area and ordering them to match how they are physically stored. This ensures your count sheets follow the same layout, allowing you to work through each area quickly and efficiently.
Stock Process with Locations
Follow these steps to start a new stock:
-
Select the required Product Division
-
Select the required Thread
Depending on the security settings applied to job roles you may only see one stock thread per division -
Enter the Site Managers Name, Stock Takers Name and select the required Stock Type
-
Click OK
-
Confirm the End Date
-
The start date will be the closing date of the last stock
-
The end date defaults to yesterday, a part day stock can be included for today by selecting the check box and setting a time
-
-
Click OK
-
Click Yes or No to proceed
If there are products not assigned to a location these will be reported as expected to be counted but automatically set against <No Location> -
Click Yes or No to print the Count Sheets as required
When selecting 'Yes' count sheets will be displayed on screen which can then be printed
-
Count sheets are displayed in either Category or Subcategory Order for the <No Location> list
-
Count sheets for locations will display the location name and product list as defined in the template

-
Click Close and the next set of count sheets will be generated for each location | repeat until all count sheets printed as required
-
-
From the Confirmation prompt select the required option
-
Yes - to proceed to entering the closing stock values
-
No - saves any figures (if already entered) and closes
If 'No' is selected selecting 'Current Stocks' from the main stocks menu will display this stock for selection
-
-
Enter the counted value into the Audit Stock Column
-
The count value should be representative of the Unit column
-
All closing stock values should be entered for each location
-
The Complete Site tab is read only and will calculate the overall total closing stock from each location / no location tabs
-
Two decimal places can be entered
-
-
Complete the remaining processes as per standard stock entry, review and acceptance
Counts by Holding Zone
For larger sites, holding zones provide a convenient way to count stock and obtain results by zone, all within the same stock system.
Stock Process with Holding Zones
Follow these steps to start a new stock:
-
Select the required Product Division
-
Select the required Thread
Depending on the security settings applied to job roles you may only see one stock thread per division -
Enter the Site Managers Name, Stock Takers Name and select the required Stock Type
-
Click OK
-
Confirm the End Date
-
The start date will be the closing date of the last stock
-
The end date defaults to yesterday, a part day stock can be included for today by selecting the check box and setting a time
-
-
Click OK
-
Click Yes or No to print the Count Sheets as required
When selecting 'Yes' count sheets will be displayed on screen which can then be printed
-
Count sheets are displayed in either Category or Subcategory Order
-
Count sheets may contain additional fields and have large spacing depending on the organisations setup
-
Count sheets will display their holding zone name
-
Click Close and the next set of count sheets will be generated for each holding zone | repeat until all count sheets printed as required
-
-
From the Confirmation prompt select the required option
-
Yes - to proceed to entering the closing stock values
-
No - saves any figures (if already entered) and closes
If 'No' is selected selecting 'Current Stocks' from the main stocks menu will display this stock for selection
-
-
Enter the counted value into the Audit Stock Column
-
The count value should be representative of the Unit column
-
All closing stock values should be entered for each holding zone
-
The Complete Site tab is read only and will calculate the overall total closing stock from each holding zone
-
Two decimal places can be entered
-
-
Complete the remaining processes as per standard stock entry, review and acceptance
-
Reports will be available by holding zone or complete site
-
Internal Transfers can be viewed by zone
-
When reviewing the stock results whilst also checking the standard stock options also ensure that the correct transfers were entered
-
Line Checks
Line Checks provide an efficient way to monitor key products throughout a stock period, helping you stay on top of items that previously showed variances or require regular attention. Depending on your system configuration, daily mandatory checks can be set up, prompting you each day via the Things to Do List to complete the required line checks.
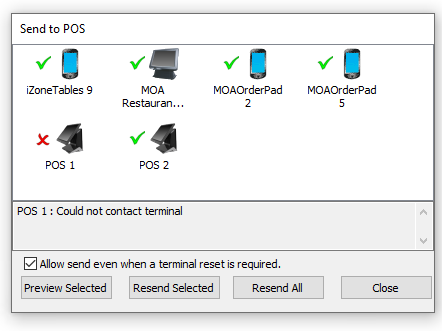
Send to POS
Whenever you make changes that affect the point of sale terminal, you must perform a Send to POS. This pushes all updates to your terminals, ensuring they are fully up to date and ready to use. Changes can include, new POS users, edits to table plan, product, price and promotion updates.
Performing a Send to POS
Follow these steps perform a send to POS:
-
From the Send to POS window click Send All
-
The process will generate the necessary files to send to all displayed terminals
-
Green Tick - the send to POS processed correctly and updated the terminal
Depending on the types of updates the terminal will either update without any interruption or the point of sale will restart, deselecting the check box will prevent send to pos when a terminal needs to restart -
Red Cross - the send failed to connect and therefore could not complete
Zonal recommends to check if the terminal is powered on and where possible any network connections are secure - if this does not resolve the problem contact either the Zonal Help Centre or your 1st line support team
-
Theme Preview
A valuable feature within the 'Send to POS' function is the ability to preview a terminal before completing a full send. This allows you to verify that everything is set up and functioning as expected.
Follow these steps to preview a terminal:
-
Select the required physical terminal
-
Click Preview Selected
-
The Previews list will be displayed during this time the selected terminals theme will be generated
When the complete the Preview will show 'Preview Ready'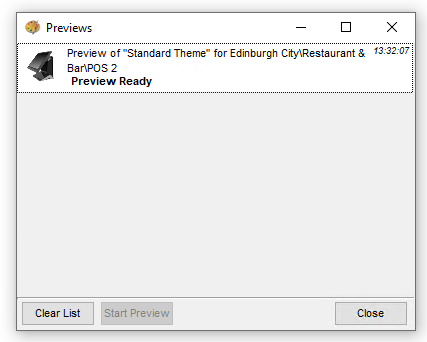
-
Double click the terminal row or select the row and click Start Preview
-
The POS terminal selected window will be displayed on screen, login using PIN or right click and select a POS operator from the presented list
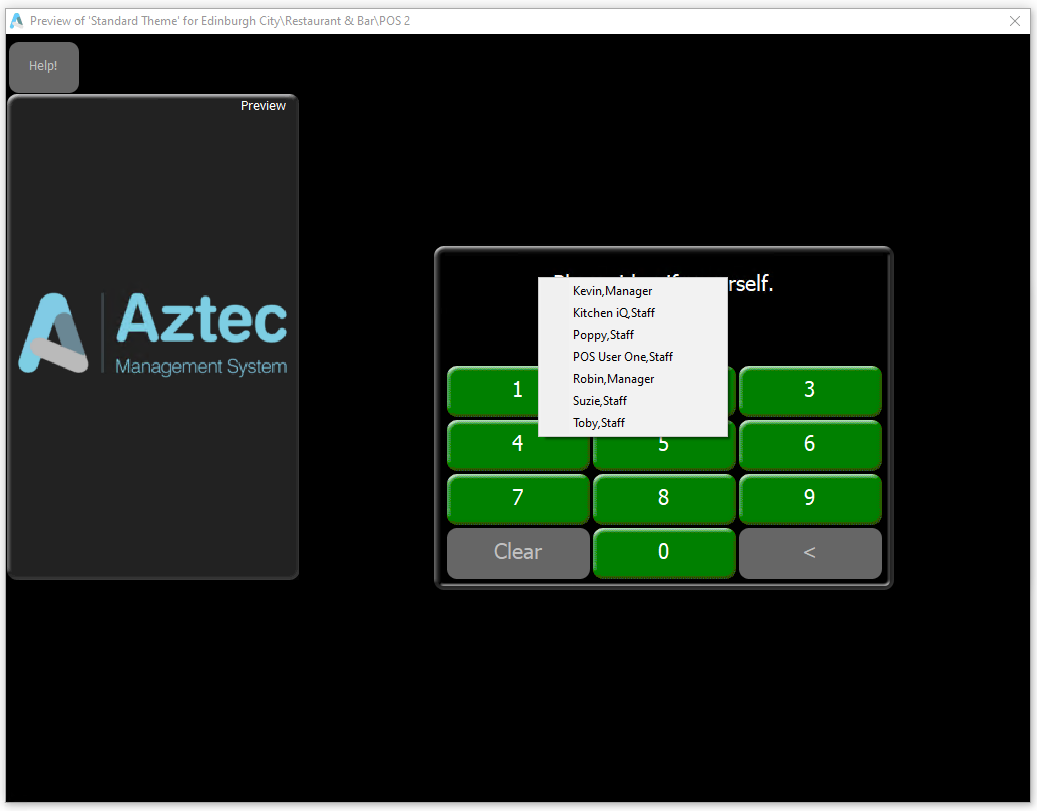 The terminal will flash between the date and time and the word 'Preview' - some actions maybe prevented being in preview mode and no transactions are live / recorded into the audit trail
Table Plans
Adding & Managing Plans
Table plans give you a clear, visual view of your site layout, making it quick and intuitive to manage service. Simply select a table on the point of sale to place and track orders.
Adding Table Plans
Follow these steps to add a table plan:
-
Click Add
-
Enter the Site Table Plan Name and Description (optional)
-
Click OK
Adding Tables
Follow these steps to design a table plan:
-
Select the required plan
-
Click Design
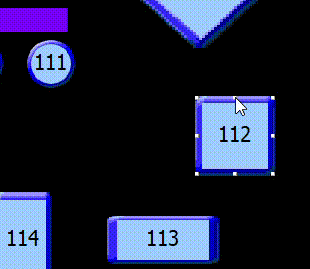
Depending on the plan selected this may already have tables added or be a blank black screen -
Right click on the black canvas and choose an option
-
New Square Table
-
New Diamond Table
-
New Round Table
-
New Label
If the table shape selected is wrong or changes later this can be updated separately -
-
Enter the Table Number
-
Click OK
-
Continue adding all the required table shapes and numbers
Table numbers are unique across the system, if your site has two or more of the same table number Zonal recommends to prefix this with additional digits such as 1001, 2001 etc -
Tables can be resized using the toggles on the table to drag and increase / decrease the size
Adding Labels
Labels are useful for identifying different areas and for building up sections or walls on the plan, helping to create a layout that more accurately reflects the real world space.
Follow these steps to add labels:
-
Right click on the black canvas and choose an New Label
-
Update the Text Label and Font Size (if required), choose the required Text and Background Colour
Zonal recommends removing text and setting both colour options to be the same to create walls or dividers for the plan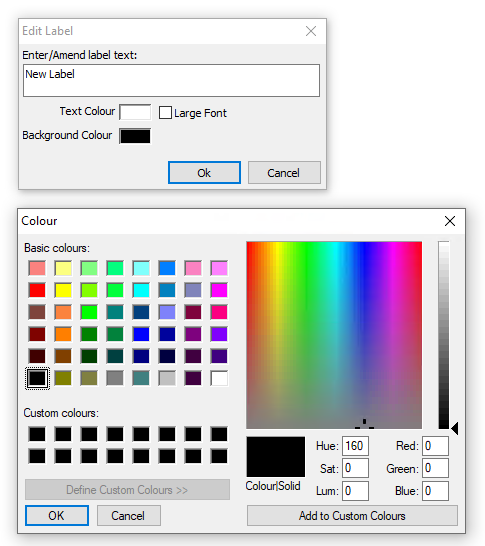
-
Click OK
-
Click Save
Updating Tables
Changing Shape
Follow these steps to change table shape:
-
Double click on the table
-
From the seat planner select the drop down and choose an alternative shape

-
Click Save
Adding Seats
If your organisation operates with per seat ordering (where individual guest orders are placed on a per seat basis) each table needing this functionality should have the seats added.
Follow these steps to add seats:
-
Double click on the table
-
From the seat planner add seats by
-
Round Tables
-
Double clicking anywhere around the and the seats will be added
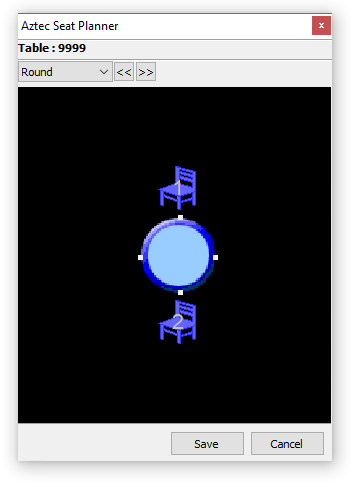
-
-
Square or Diamond Tables
-
Double clicking into the colour boxes around the table and the seats will be added
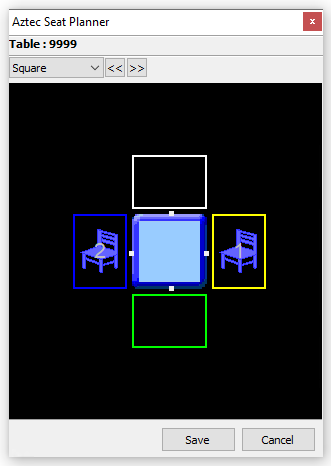
-
Seats can be removed by dragging and dropping them onto the blue table in the centre -
-
Click Save
-
Continue adding all the required seats on each table
Deleting Tables
Follow these steps to delete a table:
-
Click a table so it is selected
-
Press the <Delete> button on your keyboard
-
Click Save
Additional Information
If you are using Zonal’s Bookings products and adding tables to areas within the system (which bookings will need), ensure that the tables are configured correctly so that both systems link properly when opening new tables on the point of sale terminal or within Tables.
Matching Plans
Once a table plan has been created, it must be matched to the button on your point of sale. This ensures that when a POS operator taps the button, the correct table plan opens.
The way you complete this link depends on your Aztec installation type. If your site manages its own products and pricing locally, you are using a Site Master installation. If products and pricing are controlled centrally by head office, you are using a Site installation.
Site Matching
Follow these steps to match a table plan:
-
Select the Site Table Plan on the left
This is the table plan created -
Select the Theme Table Plan on the right
This is the button created on the theme for the table plan, these might not match exactly with what you called your table plan depending on your organisations setup -
Click Add Match
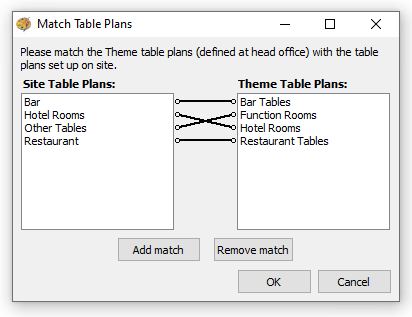
-
Click OK to complete the matching
Site Master Matching
-
Select the Site Table Plan on the left
This is the table plan created -
Select the Theme Table Plan on the right
This is the button created on the theme for the table plan, these might not match exactly with what you called your table plan depending on your organisations setup -
Click Add Match

-
Click OK to complete the matching
Site Products
Site products enables an easy way to manage daily specials, custom menu items, and site specific pricing by updating names and prices of the items displayed within this section.
Managing Product Names
Typically products are created with place holder names such as 'Main 1, Main 2' etc which can then be maintained locally onsite.
Follow these steps manage product names:
-
Select the check box for Use Site Name
-
Enter the Site Name
This name will be used on the order display and any printed materials -
Enter Site Line 1, 2 and 3
These names will appear on the buttons -
Continue updating all product names as required
Managing Prices
Follow these steps manage prices:
-
Select the required Product so that the row is highlighted
-
Select the check box for Use Site Price
-
Enter the required price for each available portion in the Site Price column
-
Continue updating all product prices as required
Additional Options
-
Subcategory Filter - will enable the grid to only show products from a selected subcategory
-
Show only changed products - will only show products that have had a site name or site price applied
-
Find product search enables a quick way to locate products by either the fixed name or the site name entered
Site Panels
Site panels offer a convenient way for you to manage a preconfigured range of products, allowing items to be easily added or removed as needed. Common uses include guest ales, daily specials, may stock drinks, or bin end wines.
Adding Products
Follow these steps to add products to site panels:
-
Select the required Site Panel from the list
If there are no site panels showing this means they have not been configured for your organisation -
Click Customise
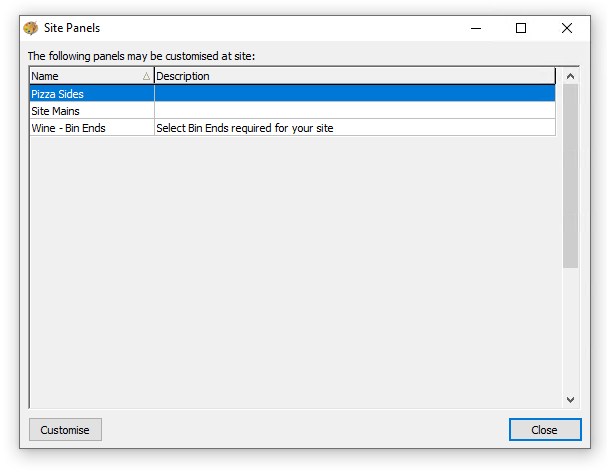
-
From the Button Picker drag the required products on to the panel
The panel space available is indicated by the grey rectangle on the black background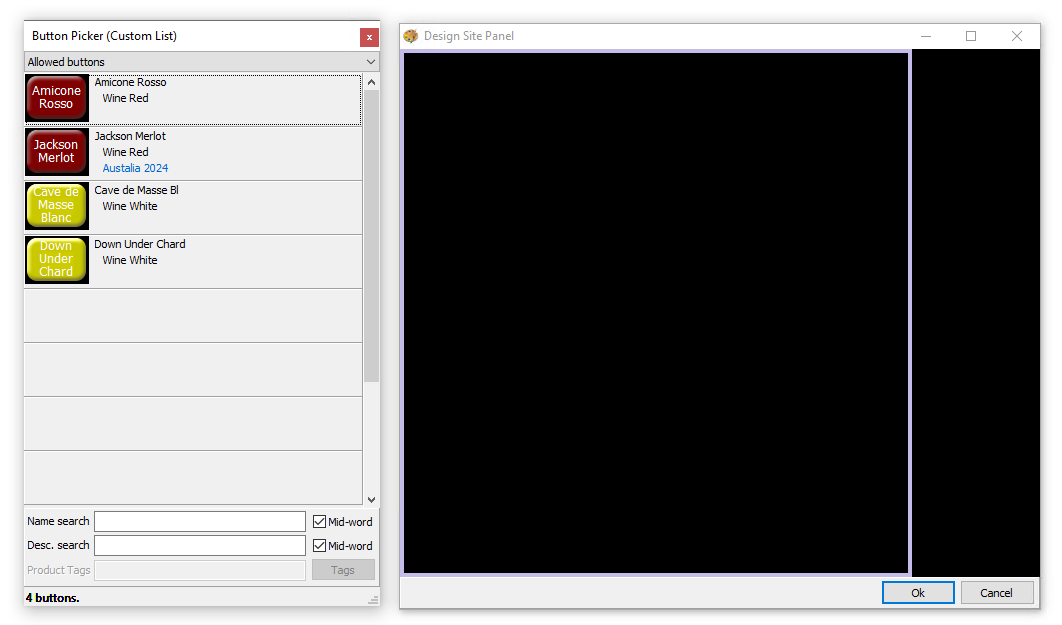
-
Click a button to
-
Drag and Drop within the panel to reposition
-
Use the toggle to increase / decrease the size
-
-
Right Click a button to
-
Change the colour
-
Change the font size
Central configurations may restrict the ability to change font size and colours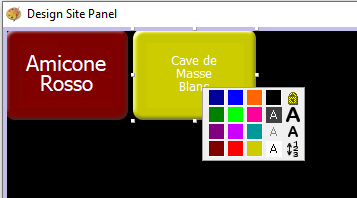
-
-
Continue adding all the required products
-
Click OK and click Close on the Site Panel List
Removing Products
Follow these steps to remove products from site panels:
-
With the selected site panel open click a product so it selected
-
Press the <Delete> button on your keyboard
-
Click OK and click Close on the Site Panel List