
How To - Lock / Unlock
Users can modify timeslots at site in real-time for the current day (if enabled for their site). This allows site users to stop online bookings being taken for a particular timeslot or open up timeslots to allow more bookings online
If your site has not been granted permission to change timeslots and cover capacity by your Brand Administrators, the feature described will not be available (The Lock/Unlock button will be absent.). Additionally, the ability to manage timeslots can be controlled by PIN entry by Site Admin. Individual staff can be issued with PIN numbers that give them permission to manage timeslots.
- Select the Reservations tab
- Select the Lock/Unlock button
-
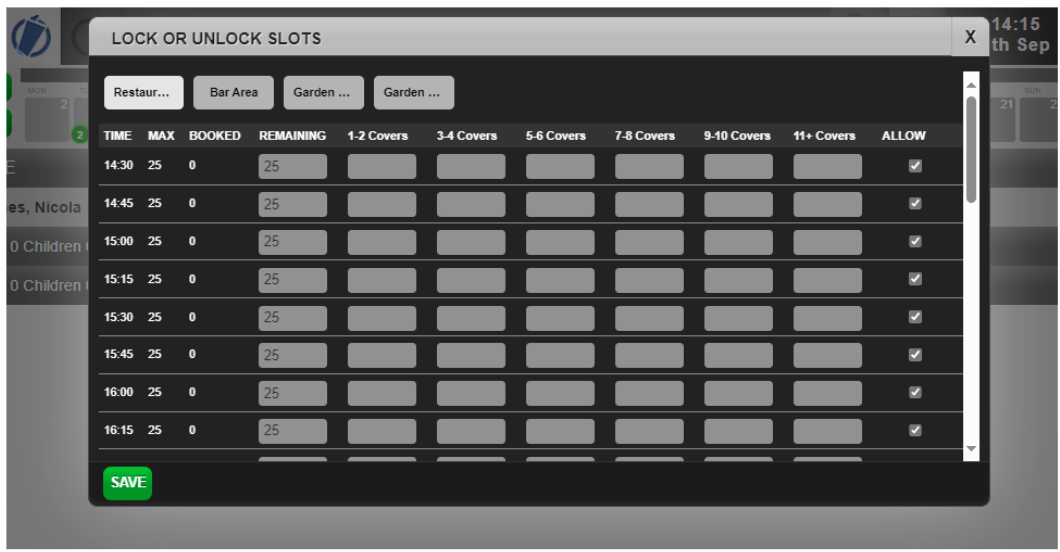
The Lock or Unlock Slots window is displayed
-
Set the number of covers available for each timeslot using the up and down arrows in the Remaining column to increase or decrease the value as required.
-
Select the Allow check-box to permit customers to book online using the booking widget.
-
Select Save to record your changes.
-
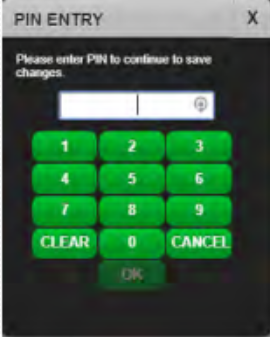
If PIN authorisation is enabled, enter your PIN and select OK.
- Select the desired menu.
Any menus selected will be displayed on the Reservations Summary screen.
If there is a child on the reservation and there is a menu configured in liveRES Reservations that is valid for the date, time and number of covers entered you will be prompted to choose a child’s menu: - Select the desired menu.
If the selected offer or menu has a deposit payment requirement you will be prompted to confirm and continue. - Amend the deposit and/or payment requirement if required.
- If configured (by site admin), you will be prompted to enter an authorisation PIN before you can proceed.
- Select Confirm and Continue.
- You are taken to the Enter Guest Details window and can continue creating the reservation as normal.
-
The Deposit and Payment Requirements window displays a note to remind the user to capture the guest’s email address once back on the Enter Guest Details window. This is to allow the system to send the guest a payment link for the deposit/payment to be made.

You can increase the number of covers up to a defined maximum.
![]()
![]()
If a deposit is required, a Deposit label is displayed on the Reservations Summary screen. This will remain displayed until the total deposit requirement has been received.
If the site has the ability to amend deposit and payment details you will be prompted to amend the values:
![]()
If a payment is required, a Deposit label is displayed on the Reservations Summary screen. This will remain displayed until the total payment requirement has been received.
If the site has the ability to amend deposit and payment details you will be prompted to amend the values:
![]()
![]()
![]()
If a menu was chosen by a guest in the Events app, the name of the menu will be displayed in the notes section as above. Tables users cannot return to the Menu Selection screen to make changes for that guest. The guest will need to return to the Events portal to change a menu selection.
Events Booking Journey
If the Events Booking Journey is configured for your site, after choosing a timeslot, staff are prompted to select occasions and menus.
Bookings created in Tables using the Events booking journey will be fully editable from Events as well as Tables, but Bookings created in Events are not fully editable in Tables.
- If an Events Booking Journey has been enabled and configured within liveRES Reservations to include Occasions, you will be prompted to choose an occasion from the available list. Occasions highlighted in red are fully booked.
- Select the required occasion.
- The Occasion Select buttons will turn red if the specifics of the occasion mean that the occasion can’t be accommodated. This can be over-ridden by the host.
- The Choose Menu window is displayed:
- Select the desired menu, or select No Menu to move to the Guest Requirements window.
- Select Confirm and Continue.
- You are taken to the Enter Guest Details window and can continue creating the reservation as normal.
![]()
If there are no occasions associated with the selected booking, a warning will be displayed to inform the user that the reservation will not be shown in Events.
![]()
If menus have not been configured to be mandatory (as defined in Events Admin) users will be able to select No Menu.
![]()
If Pre-authorisation is required, this will be stated along with its due by date(it will say ‘Pre-Authorisation required by due date).
If a deposit is required, the amount and the payment date is displayed.
If Pre-order is required, this is described and the cut-off date is displayed. A reminder is shown to prompt the host to ask the guest for their contact email details so that they can make their selections, add payment details and pay.
If the site has the ability to amend deposit and payment details you will be prompted to amend the values:
![]()
If a payment is required, a Deposit label is displayed on the Reservations Summary screen. This will remain displayed until the total payment requirement has been received.
The Deposit and Payment Requirements window displays a note to remind the user to capture the guest’s email address once back on the Enter Guest Details window. This is to allow the system to send the guest a payment link for the deposit/payment to be made.
![]()
If a menu was chosen by a guest in the Events app, the name of the menu will be displayed in the notes section as above. Any emails that are generated as a result of changes made in Tables will be sent from Events.