
How To - General Layout
Product Modelling is where all products are created for the Aztec system; this How To guide shows all of the options and what they are used for within the module.
Throughout, refer to the image below, and the numbers attributed to each section, for a visual representation:
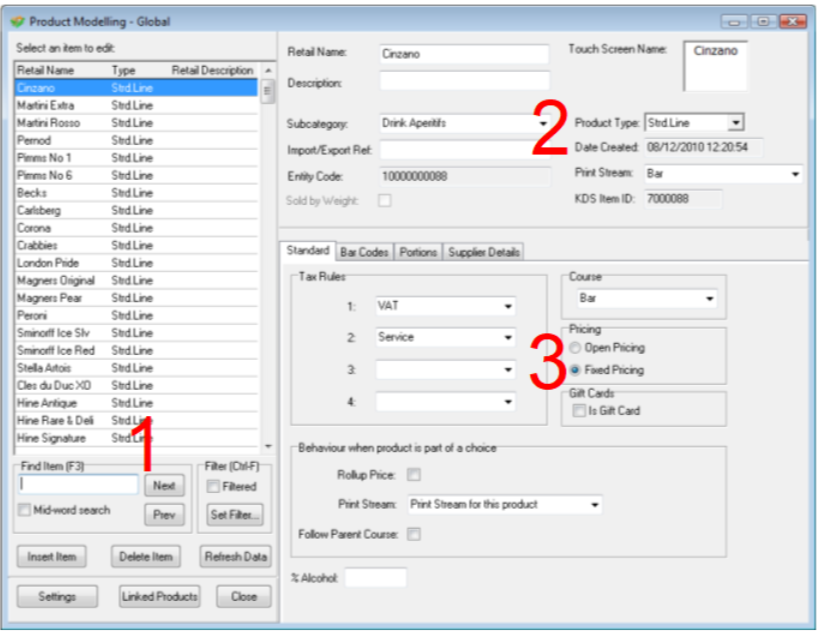
Section #1
The product list is displayed in the pane on the left, below which are the search options, filtering options and ability to add or delete products.
-
Product Name listed with the product type and description; to change the description to display the entity code, right click in the retail description area in the product list and choose entity code.
-
Search for products in the find item box; tick the "mid-word search" box if you are not sure on the exact name of the product e.g. 'Daniels' will find 'Jack Daniels' if mid word is ticked
-
Next and Prev will go backwards and forwards within the list of search items
-
Insert Item will create a new product and use the current highlighted product as a template
-
Delete Item will remove that product completely from the system but still can be used for reporting or stocks
-
Refresh Data will display latest up to date data if multiple people are working in Product Modelling
-
Settings allows you to select how you wish to display the budged cost price used in choices either by minimum, maximum or average item cost
-
Linked Products will display a list of any products that the current highlighted product is used as an ingredient in; this can be copied and pasted to notepad and the product entity codes will be displayed
-
Close shuts down Product Modelling
-
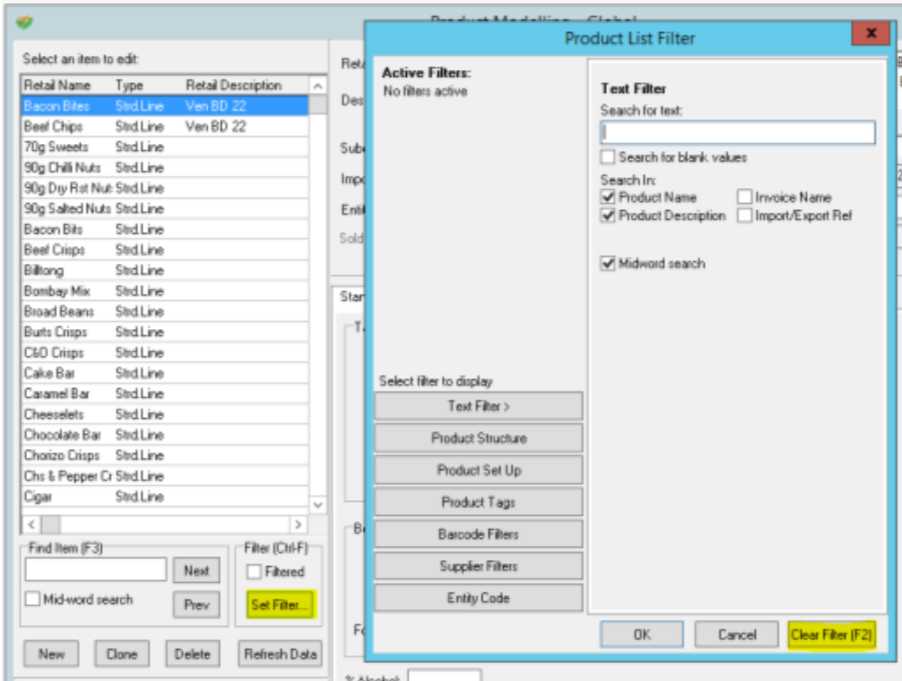
Set Filter allows a number of criteria to be applied to filter the list of products being displayed
-
Select a range of products where the name or description or matches some set text
-
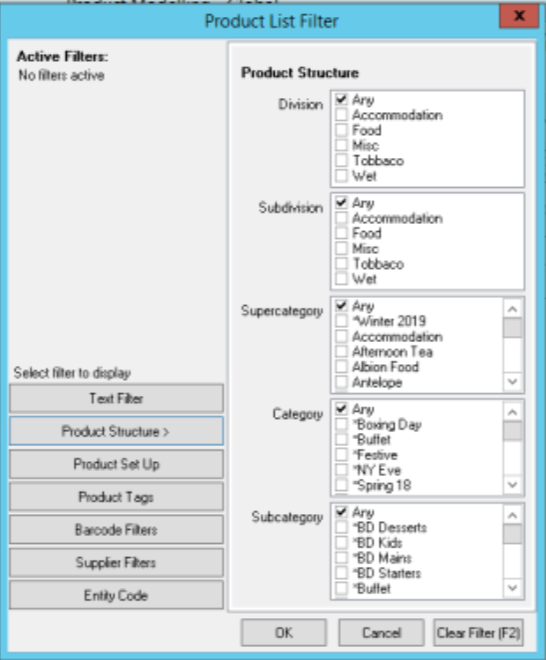
Filter by any product type, division, category, subcategory and discontinued products or entity code
-
Clear Filters removes any set filters and start the filter process from all blank selections
Section #2
This section shows the type of product and what subcategory group it belongs to, along with some additional information.
-
Retail Name - the name of the product
-
Description - free format text box to allow further details about the product
-
Touch Screen Name – what will appear on the button that would be added to a theme
-
Subcategory – product family that the product belongs to in the product structure
-
Import/Exp Ref – allows a unique code to be entered for a product for example an internal reference unique to your company
-
Entity Code – unique code the system generates for every product
-
Sold by Weight - indicates that this item is an item sold be weight using Avery scales
-
Product Type – this is the type of product there are the following product types:
-
Standard Line – product bought in from a supplier and sold directly on to a customer
-
Recipe – product made up on site
-
Purchase Line – product bought in from a supplier but not sold
-
Prepared Item – a batch of multiple items that can be used as an ingredient
-
Choice – selection of products
-
Instruction – product preparation instruction not linked to any stock item
-
-
Print Stream – defines the location of the printing for that product item
Section #3
This section comprises of four tabs - Standard, Barcode, Portions and Supplier. Each of these will be detailed below.
-
Tax Rules – each product can have up to four tax rules linked
-
Course – the head at the top of the ticket when printing to a remote order printer
-
Pricing – fixed price uses the price done in Standard Pricing and open price allows the user to specify the prices when the button is pressed on the POS – when using open pricing the product will not be displayed in the price matrix
-
Gift Cards – tick if the product is a gift card only used in conjunction with the CHIPS interface
-
Rollup Price – when using selection or products as part of a choice with supplement prices rollup pricing will just show a total price against the top item on the bill or receipt
-
Print Stream when part of a choice – this specifies when the product is part of a choice what print stream should it use the one set on the product or the one set against the main product
-
Alcohol % - used to display on the Aztec Tariff application
-
Barcode – allows multiple barcodes to be associated to a product
-
Portions – allows multiple portions to be configured against one product up to 20 portions can be configured per portion, displayed is the cost price per portion
-
Ingredient as of – allows a change of ingredients to be made in the future eg a menu change
-
Containers – allows you to select the container that would be associated to a product when using an Avery scale device
-
Insert Ingredient – allows the insert of an ingredient into a product
-
Append Ingredient – insert a new ingredient but below the one currently highlighted
-
Edit Ingredient – allows the ingredient to be changed
-
Delete Ingredient – allows the ingredient to be removed from list
-
<Enter> will also bring up the edit ingredient window
-
<TAB> will move around the ingredients window
-
<Insert> will insert an ingredient
-
<Delete> will allow you delete an ingredient
-
Supplier Details - is where all the cost price and supplier information is set
-
Invoice Name – this is the name that would appear when entering delivery notes it can be different tot the retail name
-
Stock Unit – is the unit in which the product will be counted when performing a stock
-
Supplier - is where the product is bought from
-
Unit – the quantity in which the product is bough from the supplier
-
Flavour – if an item is being sold but has multiple flavours eg cordial the flavour name can be added and then used within the ordering option to select the flavours to order
-
Supplier Ref – allows you to enter a unique reference for the product
-
Barcode – is the pack barcode used when doing stocks and deliveries with a handheld
-
Cost Price – is the net value of the product being bought from the supplier