Introduction
Document Scope
This guide is aimed at Zonal and client staff that are responsible for installing or getting the necessary components
installed and configuring all areas of the system.
Overview
HLS PMS is a plugin that integrates with Aztec to facilitate real-time room and non-room postings against an account in a hotel environment.
The Aztec Hotel Import function allows for all sales, payments, balances carried forward, deposit and sales ledger balances held in HLS PMS to be imported into Aztec and be reported against payment methods and products so that a true reflection of all site revenue can be displayed in Aztec. The hotel sales are only shown in the 7 Day Statement of Trade and the Period Statement.
Hotel charging can be supported on digital ordering journeys also but extra set up is needed within the iOrder platform.
Prerequisites
The following applications/versions and services are required to support HLS PMS operation within Aztec:
• Aztec 3.11.0 or later at head office and site
• iZone POS Integration Engine v1.22.0 or later at site
• High Level Software (HLS)
• Aztec Hotel Import
• WinSCP 5.11.2 or later at site
• Categories must be used in HLS
Installation
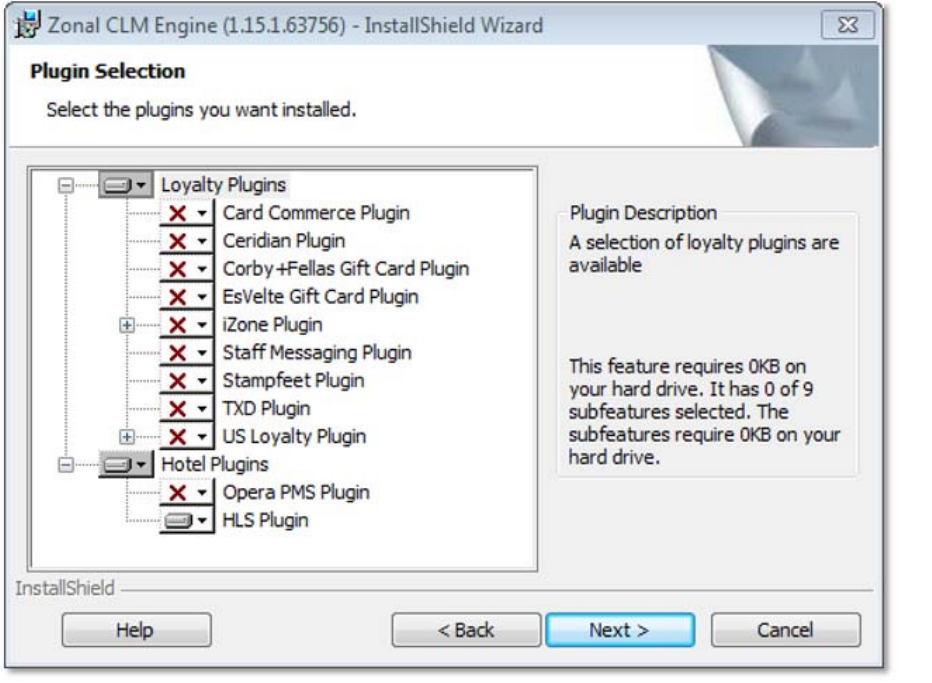
The HLS PMS Plugin is installed via the iZone installer, included in a separate section reserved for plugins. This task is carried out by Zonal Technical Support staff.
Setup Process Overview
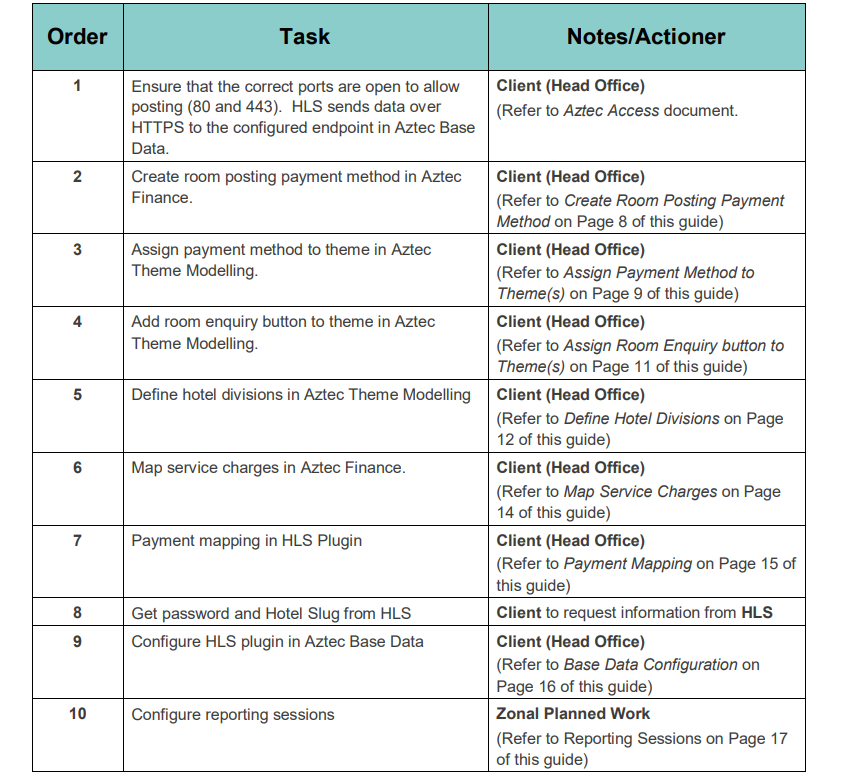
Room Posting
Please carry out each step in the order shown and note that only certain steps can be carried out by clients; others require to be done by Zonal Technical Staff.
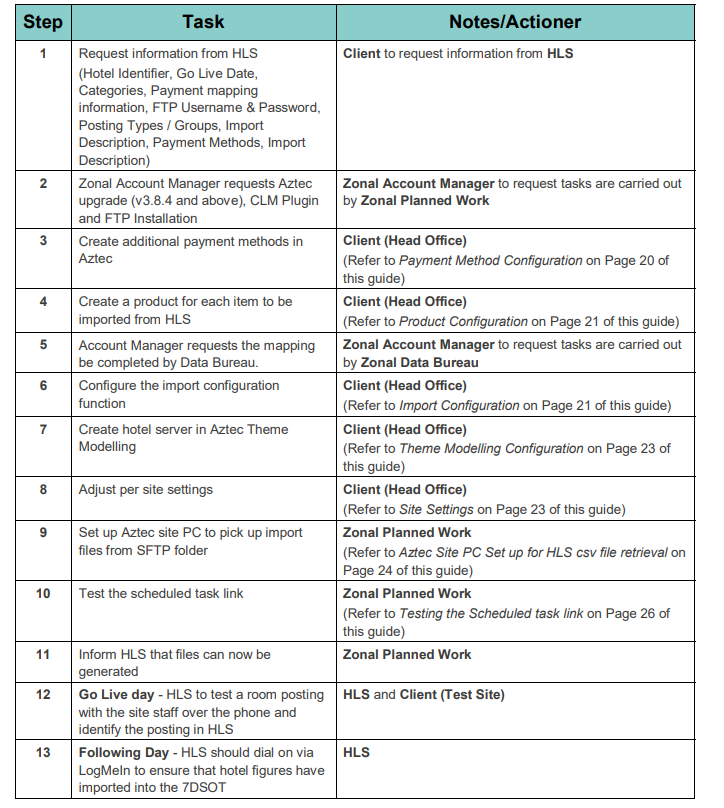
Hotel Import
Please carry out each step in the order shown and note that only certain steps can be carried out by clients (system administrative staff); other tasks require to be done by Zonal Technical Staff.
Aztec Configuration
Aztec must be configured as described in this section, before the HLS PMS Plugin can be used to make room postings.
Create Room Posting Payment Method
A new payment method is required for the HLS Plugin to correctly be used by the POS:
1. From the Head Office Aztec Start Page, open Aztec Finance and select Configuration | Payment Methods from the left-hand navigation bar.
2. Click Add and create a new payment method as shown in the example below. Select type as ‘Room (SOAP)’.
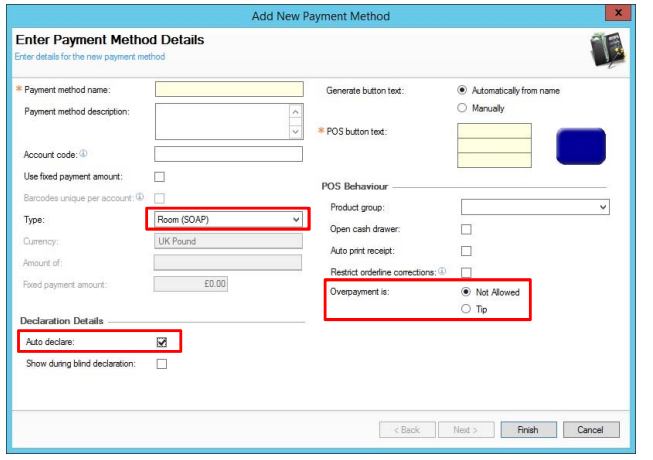
3. The payment method should be set to Auto declare
4. Room posting payment methods require the overpayment options to be defined:
a. Not Allowed – This prevents the server from charging more than the account balance at the POS and the system does not prompt for Tips.
b. Tip – This option automatically assumes that any overpayment made at the charge screen is to be applied to the account as a Tip.
Additionally, if no overpayment is entered, the server is prompted to add a tip to the payment after the payment has been processed.
Assign Payment Method to Theme(s)
When the necessary room posting payment method has been created, it must be included on all the required theme panels in Aztec Theme Modelling to allow room postings to be processed.
1. From the Head Office Aztec Start Page, open Aztec Theme Modelling and select Shared Panels from the main menu.
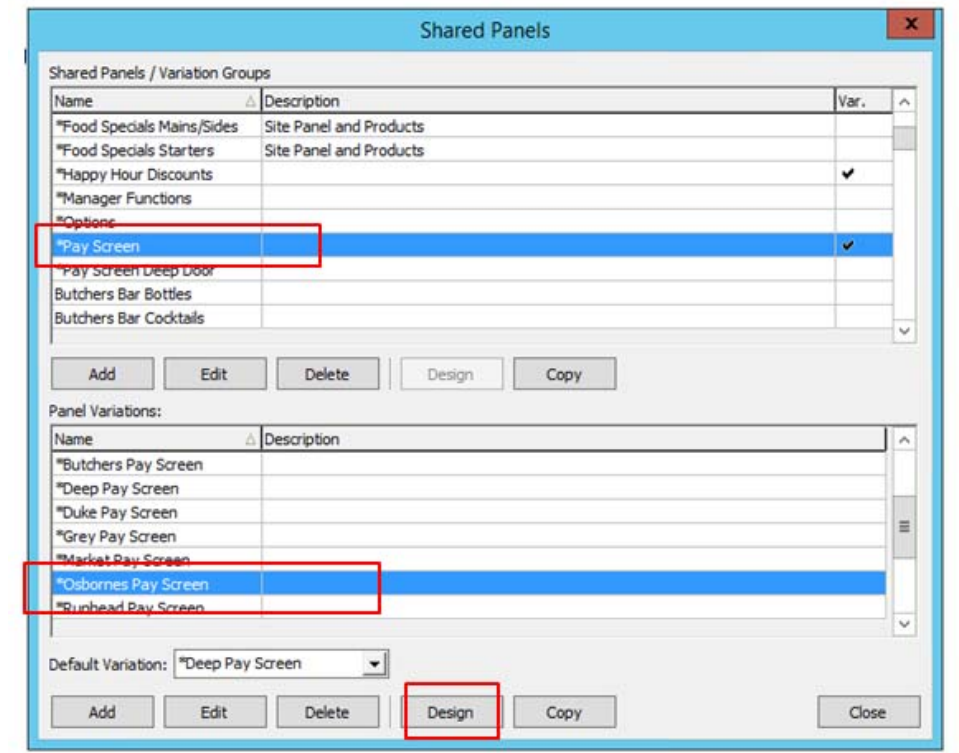
2. Select to highlight the Shared Panel in the top pane and the Panel Variation (if applicable) to be changed in the middle pane, and click Design.
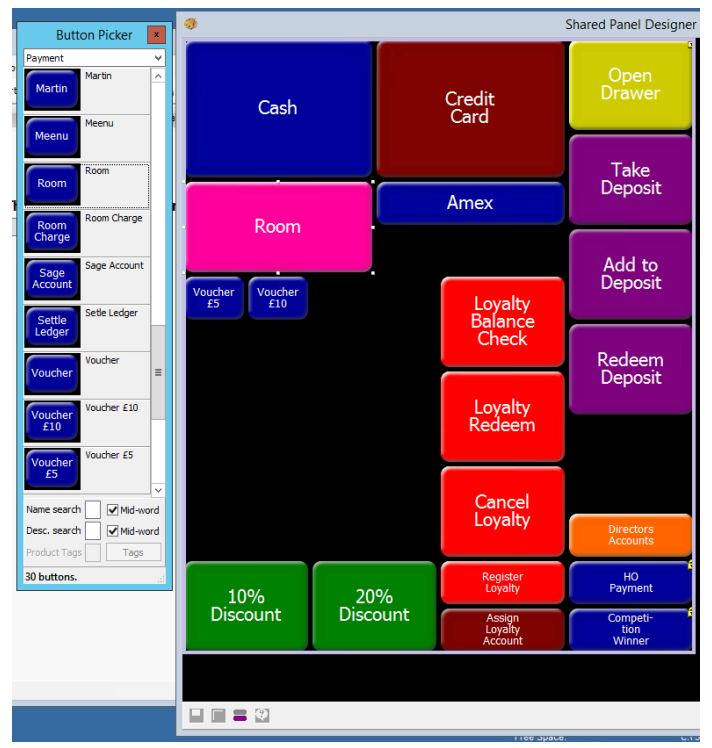
3. Open the button picker, locate the new button in the Other Lists | Payment folder and add to the panel.
4. Click Close and Close again to return to the Aztec Theme Modelling main menu.
Assign Room Enquiry button to Theme(s)
To enable POS operators to make a room enquiry to display guest information, the relevant enquiry button must be included on all the required theme panels in Aztec Theme Modelling to allow room postings to be processed.
1. From the HO Aztec Start Page, open Aztec Theme Modelling and select Themes from the main menu.
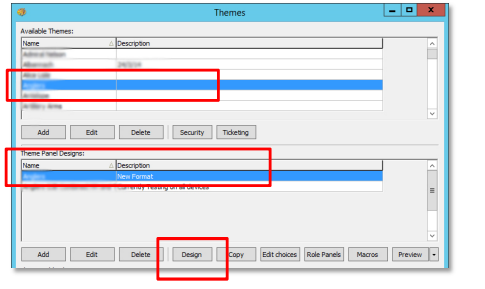
2. Select to highlight the Available Theme in the top pane and the theme panel design to be changed in the middle pane, and click Design.
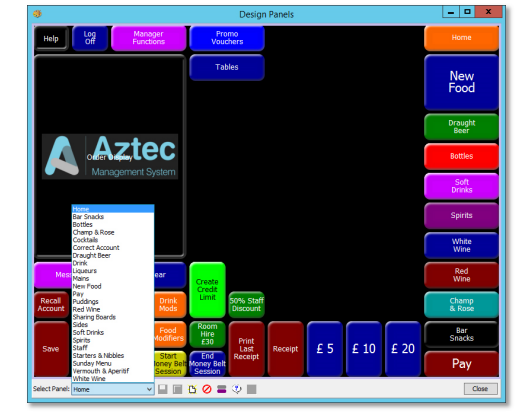
3. Select the panel to which the new room enquiry button is to be added. Open the button picker ( ), locate the new button in the Other Lists | iZone folder and add to the panel.
4. Click Close and Close again to return to the Aztec Theme Modelling main menu.
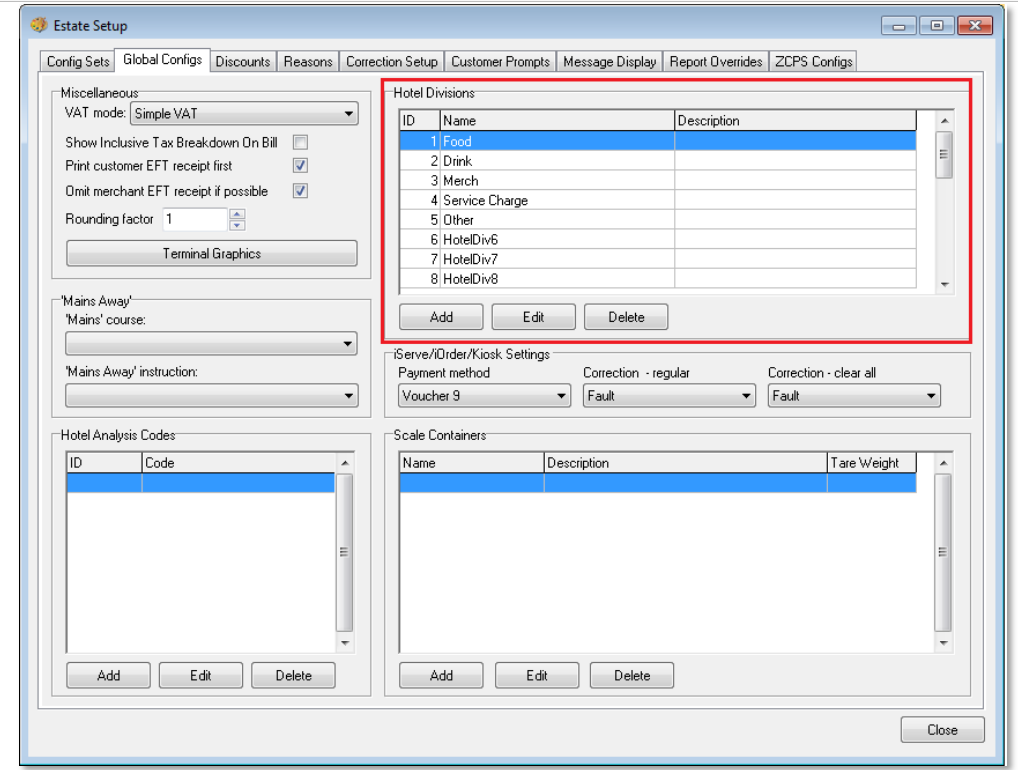
Define Hotel Divisions
Hotel divisions must be defined to align Zonal product groups to the product groups that are already configured in the local Hotel System.
1. From the Aztec Theme Modelling main menu, select Estate Setup | Global Configs.
2. When all the required Hotel Divisions have been set up, they must be assigned to the appropriate subcategory. Still within Aztec Theme Modelling | Estate Setup, open the Config Sets tab page. Map each of the sub-categories to an appropriate Hotel Division.
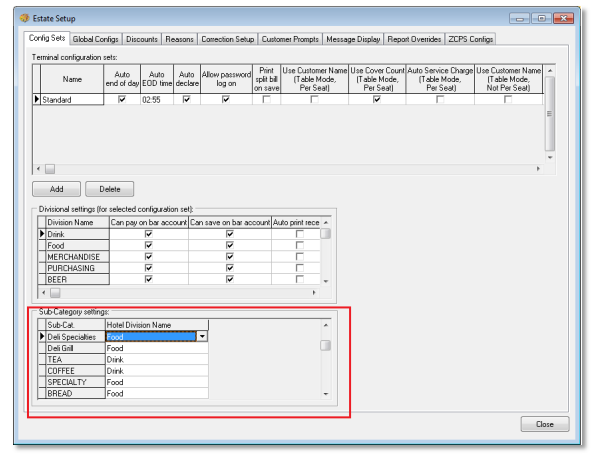
It should be noted that each Config Set can have a different assignment of Hotel Divisions to Sub-categories. If not handled carefully, this could cause problems when reconciling data in the hotel system, as divisional data is assigned in the Hotel messages based on each ID.
Example:
• If on config set A, Sub-category A is assigned to Hotel Division 1. Any purchases for subcategory A will be sent under ‘Hotel Division1’ in the message to the Hotel Interface.
• If on config set B Sub-category B is assigned to Hotel Division 1. Any purchases for subcategory B will also be sent under ‘Hotel Division1’ in the message to the Hotel Interface.
This means that the Hotel System will receive two different subcategories in the same subtotal resulting in possible reconciliation errors.
Map Service Charges
To enable the HLS PMS Plugin to separate out the Service Charges from all other divisional data, the Service Charge Divisional Mapping must be configured.
1. From the Head Office Aztec Start Page, open Aztec Finance and select Configuration | Exclusive Tax Rules from the left-hand navigation bar.
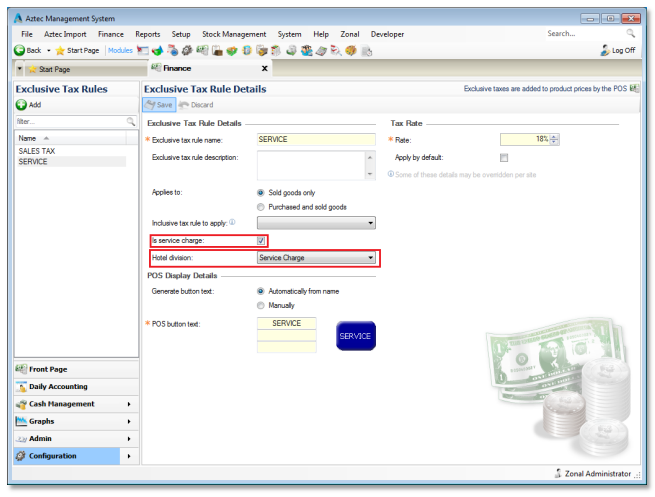
2. Ensure the `Is service charge’ check-box is selected
3. Ensure a Hotel Division (configured in the previous section) is to create the mapping.
4. Complete the rest of the fields and click Save.
The mapping is again configured to Hotel Division ID (so a Service Charge mapped to Hotel Division 5 will be posted under Service Charge Slot).
If the Hotel Division assigned to the Service Charge is also assigned to another Subcategory, all purchases underneath this Sub-category will also be posted to the Hotel Interface as a Service Charge.
Payment Mapping
All payment types in Aztec must be mapped to one of five payment types in HLS:
• Cash
• CreditCard
• BACS
• Cheque
• GiftCard
When the HLS plugin starts, it will look for a file called HLSPaymentMapping.XML. This file should be stored in C:\ProgramData\Zonal\CLM
• If the file exists then it will be used on start-up
• If the file doesn’t exist then the system will generate a mapping file on first run using the default mappings
This file maps Aztec Payment Method Types to one of the five HLS options. If an Aztec method type ID does not exist in the XML, or exists without a mapping, the system will default to use HLS’s Cash method.
To make changes to the mappings, or if new payment types are added to Aztec in the future, this HLSPaymentMapping.XML file should be updated by a Zonal and the CLM service restarted.
Note that this is a file per site mapping.
Base Data Configuration
CLM configuration for the HLS plugin must be setup in the Aztec Back office:
1. Log into Aztec using your username and password.
2. Select the Base Data module icon on the Aztec Start page.
3. Select Estate Structure | [Site Tree Node] | CLM Tab.
4. Select HLS from the CLM Plugin Settings section.
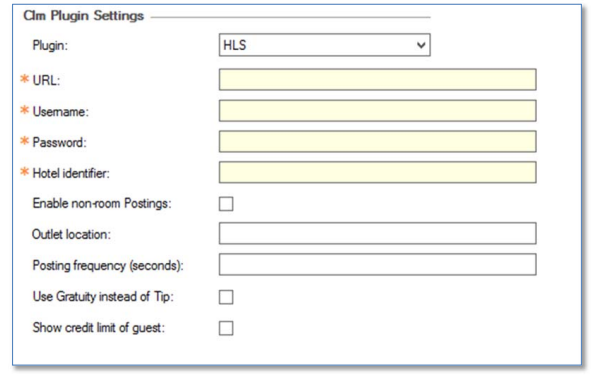
5. Enter the required values for the plugin.
• URL – The Endpoint that Room posting requests will be sent to. This will always be https://live.highlevel-software.com/hotels/
• Username – The username for endpoint security. This will always be terminal@zonal.co.uk
• Password – The password for endpoint security
• Hotel Identifier – The identifier for the Hotel (Provided by HLS, they call it “Hotel Slug”)
• Enable Non-Room Postings – This configures whether other charge types (Cash, Card, etc.) should be
posted to the HLS endpoint for reconciliation on their system. This can be left unchecked if only room
posting to hotel account is required
• Outlet Location – This is the location that Non-Room payments should be sent to if enabled. (Provided by HLS) **Must Be supplied if Non-Room Postings is Enabled**
• Posting Frequency (Seconds) – The frequency of posting Non-Room Payments. Minimum 10; Max 120 **Must Be supplied if Non-Room Postings is Enabled**
• Use Gratuity instead of Tip – Select if the word Gratuity should be used on receipts and certain EPoS display windows.
• Show credit limit of guest – Select if the guest’s credit limit is to be shown on the POS button that
POS users click to charge to guest accounts.
6. Select Save when complete and exit Aztec Base Data.
7. Open Aztec Comms and create a communications job. Send to site with an Auto Send to POS
Reporting Sessions
Reporting sessions must be manually inserted into the Aztec Database by Zonal Technical Support staff. Session information is stored in the HotelDivision table. For example:
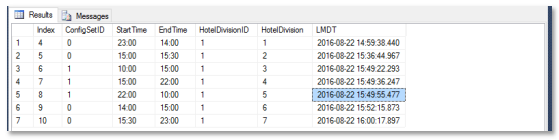
Sessions are assigned per Config Set, and must adhere to the following rules:
• Sessions for a single config must cover a 24-hour period
• No session can overlap another
• There must be no gaps between sessions for a single config (i.e. one session must start when another ends)
• It is valid for no sessions to be assigned to a config, however the POS terminal using this config set cannot
in turn be used to process hotel postings
• If Non-Room posting is enabled, ALL config sets assigned to POS devices must have a set of sessions assigned
• Table HotelDivision must be edited at Head Office only. Never at site
Additional Data
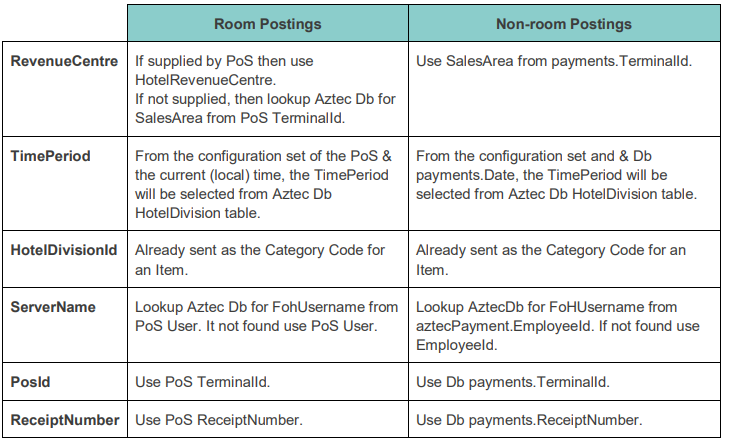
From release v1.22.0, the HLS plugin provides additional details to HLS via their API. For room posting the data comes from the PoS. For non-room postings the data must be manually inserted into the Aztec Database.
Hotel Import Configuration
Aztec must be configured as described in this section, before the HLS Aztec Import can be used to update Aztec reports with HLS Financials.
HLS creates a csv file that contains all of the information to post into Aztec. A service installed on the site PC retrieves this file and places it in a specified location for import.
In order for this csv file to correctly import into Aztec, the necessary configuration must take place either at Head Office or on the Site Master PC.
Request information from PMS Provider
Prior to being able to configure the import the following information needs to be requested from the PMS provider. As each provider uses different terminology for the posting type and payment methods the information should be requested according to the information below. The descriptions are the coding used in the file to be imported and these must be provided so the import can be configured correctly.

The Hotel Import Configuration Tool is found on the Head Office or Site Master PC in C:\Program Files\Zonal\Aztec
Payment Method Configuration
Create the following mandatory payment methods in Aztec.
1. Select the Finance Module and go to Configuration > Payment Methods.
2. Click the Add button and create the following payment types:
HDeposit Add linked to a type of External System Take Deposit
HDeposit Rdm linked to a type of External System Redeem Deposit
HLgr Post linked to a type of External System Charge Ledger
HLgr Settle linked to a type of External System Settle Ledger
HRoom Post linked to a type of External System Charge Ledger
HRoom Settle linked to a type of External System Settle Ledger
3. Create further payment methods based on the information provided from the PMS provider in most instances to distinguish between EPOS payment methods and PMS payments. Create payment methods called HotelCash, Hotel Visa, Hotel Mastercard etc.
Each payment type should be configured as Central type and if cash is required to be included as part of the overall cash values in Aztec this should be configured to a Cash type.
Please make sure at least 1 hotel card payment has tips allocated as the overpayment behaviour otherwise the import will not work.
Discuss with the customer if they would like to breakdown all of the card payments or if they would be happy to have Hotel Card as a payment type in Aztec which all payments would be mapped to.
Product Configuration
In order for the PMS sales to import into Aztec a product for each or combined items should be created in Aztec, for example you may have sold through the PMS a selection of items such as accommodation, newspapers, telephone charges, photocopies, room hire etc.
Discuss with the customer, the requirements for products to be created along with their location in their product structure.
Recipe line products should be created in Aztec that will later be mapped in the import configuration to allow the sales to be posted. When these products are added, they should only be used for the hotel import and to ensure this, add a suitable description in the description box of the Hotel Import.
Import Configuration
When all of the previous steps have been carried out, the import configuration function can now be configured.
1. Launch the HotelImportConfiguration executable which can be located in the c:\program files\zonal\aztec
folder.
2. Login with zonalhc or other appropriate login.
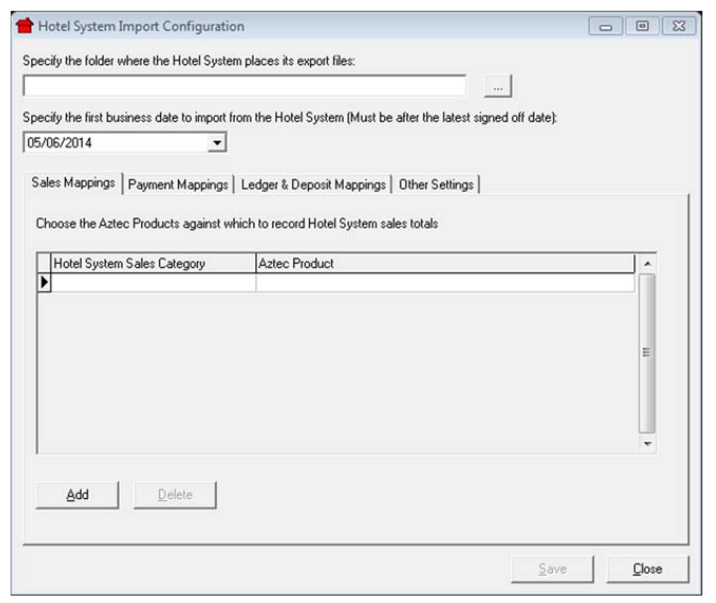
3. Specify the location where the PMS provider will export the csv file to on the Aztec PC. The standard configuration for this is D:\aztecdata\HotelImport
a. This location should be created on the Aztec PC
b. HLS require WinSCP to be installed on the site PC and the Retrievelatestfile scheduled task to be setup as per the HLS Room Postings and Aztec Import Setup Guide document.
4. Sales Mappings – click the Add button and specify the first sales category to be imported. The formatting of this code is import because it will be what is contained within the csv import file. If it is incorrect then the file will not import. As described in step 1 different providers offer this in different formats. Add in all of the required codes. If there are multiple PMS providers within a single customer estate all of the codes if
different can be added.
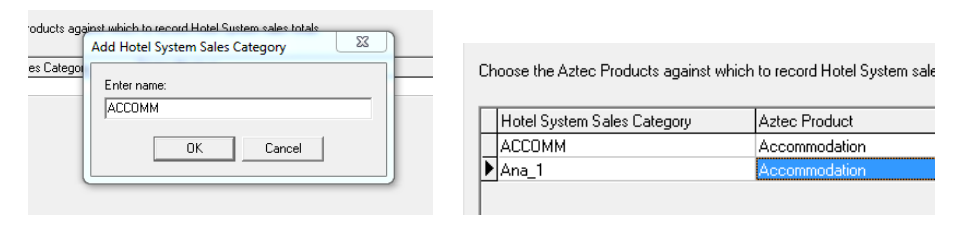
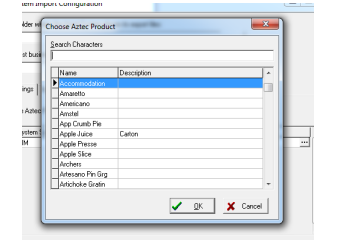
5. Next to the categories entered click into the Aztec Product box and select the required products that were created in step 3 to map the PMS revenue to the Aztec product.
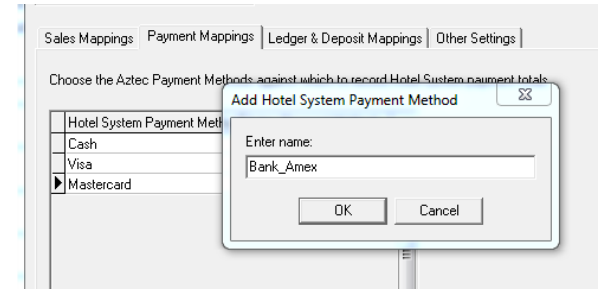
6. Payment Mappings – click the mappings tab and click the Add button and specify the first payment method to be imported. The formatting of this code is important because it will be what is contained within the csv import file. If it is incorrect then the file will not import. As described in step 1 different provides offer this information in different formats. Add in all of the required payment methods. If there are multiple PMS
providers within a single customer estate all of the codes if different can be added.
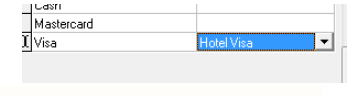
7. Next to the payment methods entered click into the Aztec Payment Method box and select the required payment methods created in step 2 to map the PMS payments to the Aztec payments.
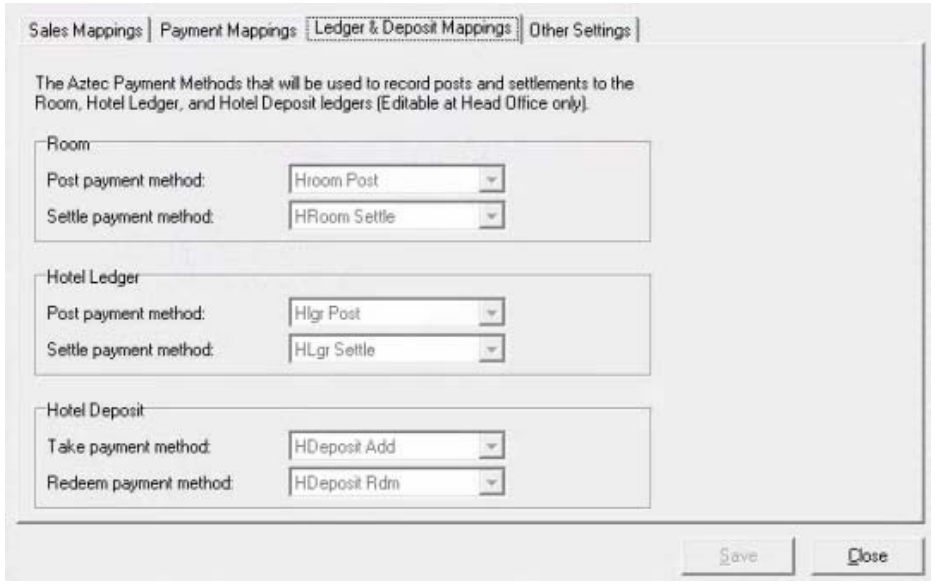
8. Ledger & Deposit Mappings – click the mappings tab and for each type select the payment types created instep 2 (HLgr / HRoom / HDeposit).
9. Other Settings – allows for tips to be specified into a set hotel code, only 1 code/category is allowed per estate.
Theme Modelling Configuration
In order for Aztec to import the hotel sales a hotel server has to be created in Theme Modelling.
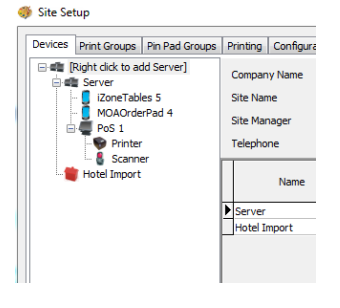
1. Open Aztec Theme Modelling module and go into Site Setup for the required site.
2. Right-click to Add a Server and from the hardware type select Hotel System.
3. Enter a name e.g. Hotel Import and click OK, a monopoly style hotel icon will be now displayed at the bottom of the tree.
Site Settings
When all of the Aztec configurations have been completed and the necessary communications jobs have been run to the site some settings can be adjusted in the hotelimportconfiguration executable located in the same Aztec folder on-site. C:\program files\zonal\aztec
1) Adjust the date as required for the import.
After all of these configurations are complete csv import files can now be generated by the PMS provider and imported into Aztec.
Aztec Site PC Set up for HLS csv file retrieval
All the required files for the site setup can be found in R:\Hotel Links\HLS SFTP Aztec Import
These are:
• WinSCP-5.11.2-Setup
• RetrieveLatestFile.script
• RetrieveLatestFTPFile.bat
• Create Scheduled Task.bat
These files need to all be transferred to the Aztec site PC and must be placed in the C:\Transfer\HotelImport folder (to be created if it does not already exist)
1. Install WinSCP – Selecting the typical / Standard Installation options
2. Open the RetrieveLatestFile.script in Notepad and edit to contain the correct
a. FTPUser – supplied by HLS, normally the HotelIdentifier (slug)
b. FTPPassword – supplied by HLS, normally the HotelIdentifier (slug)
c. Hostkey – always “ssh-rsa 2048 0e:ce:3e:a2:be:7e:45:1f:0b:dd:c5:41:e0:96:c9:b7”
Example file content:
# Connect to SFTP server using a password
open sftp://hlszonal:hlszonal@ zonal.exavault.com -hostkey=" ssh-rsa 2048
0e:ce:3e:a2:be:7e:45:1f:0b:dd:c5:41:e0:96:c9:b7"
# Download file
get -latest -delete * D:\Aztecdata\HotelImport\
# Exit WinSCP
Exit
3. Run the Create Scheduled Task.bat file, this creates an hourly Windows scheduled task to pick-up any HLS import files from the SFTP server and copy them to the Hotel Import folder on the Aztec site PC as configured in the Hotel Import Configuration Tool.
For HLS Imports this should always be D:\aztecdata\HotelImport
**if the location will be different the RetrieveLatestFile.script will need to be updated to reflect the
folder location
The connection details can be tested by running WinSCP and setting up a connection to the SFTP site using the
HLS supplied details:
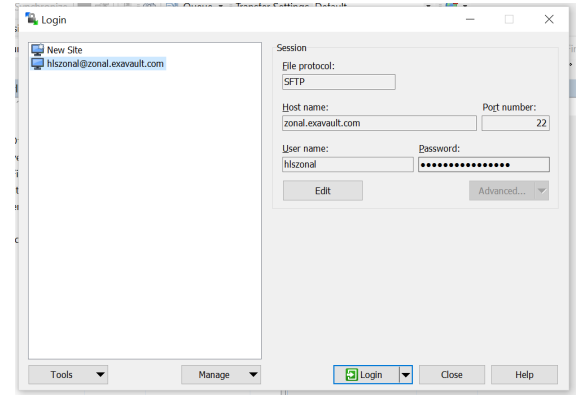
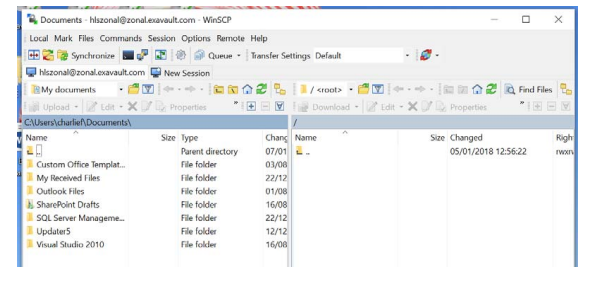
On successful connection you will be taken to the HLS FTP folder:
Testing the Scheduled task link
Use the following method to ensure that the scheduled task file move works correctly before completing the
installation:
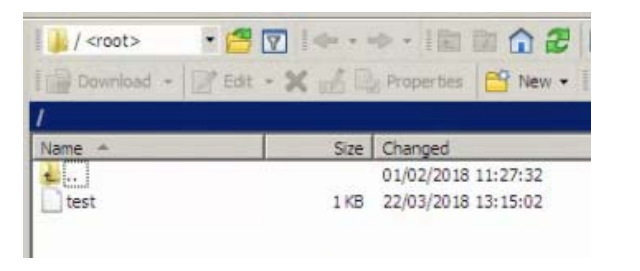
1. Open WinSCP and log in to the zonal.exavault.com FTP.
2. On the root of the HLS FTP (right hand side), right click and select new > file.

3. Enter the file name “test”.
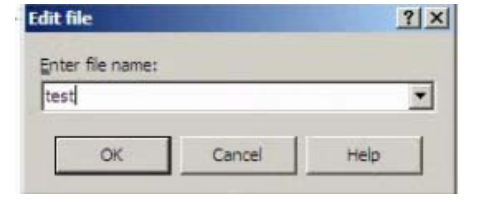
4. Type “test” into the text field and click save.

5. Exit out of the text window; you should now see the “test” file in the Root folder in the zonal.exavault.com FTP
after refresh.
6. Open up windows scheduled tasks and run the HLS FTP Import task.
7. Browse to the HotelImport folder usually configured in D:\Aztecdata\hotelimport.
8. You should now see a “test” file in this folder if the scheduled task has worked correctly.
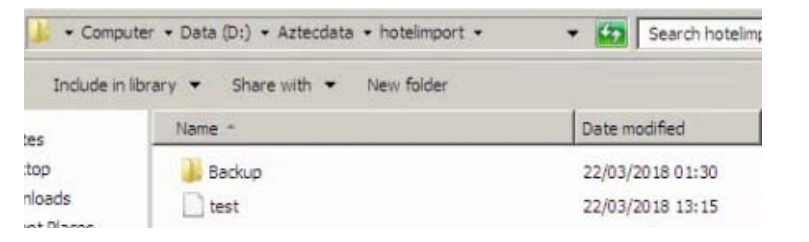
9. Right click this and select Delete.