Securing Google Approval to Publish Wallet Passes for Loyalty Cards
Introduction
This guide will cover the process of gaining publishing access from Google in order for your guests to add Loyalty cards to their Google Wallets. The guide assumes that Apple and Google Credentials (to be created by Zonal) have been supplied and that you have already created a Pass Template, so please ensure that these steps have been completed before continuing.
The approval process contains 2 steps:
-
Requesting Publishing Access;*
-
Submiting Additional Information for Approval;
*Please note this step may not be required if using for Google Pay & Wallet Console for other elements. When you navigate to Google Wallet API page if it DOES NOT state “You’re in demo mode” approval is not required, and you are ready to go live
Request Publishing Access
Publishing access can be secured by doing the following:
-
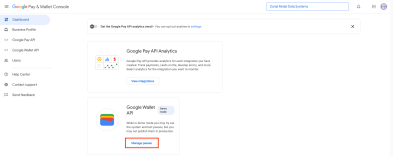
First, go to the Google Pay & Wallet Console (make sure you're signed in with the Google Developer Account used to generate the pass credentials);
-
From the Dashboard choose the 'manage passes' option within the Google Wallet API section;
-
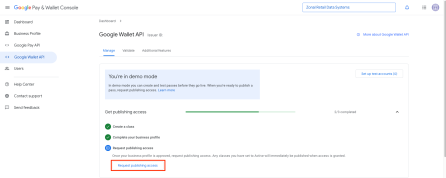
You will see that before you can request Publishing Access there are 2 steps to be completed (Create a Class & Complete your Business Profile). Both of those should already be complete as these are required to generate the credentials needed to save a template in Pass Creator.
-
By clicking 'Request Publishing Access' a dialogue box will appear which requires you to write a short summary of how the passes will be used. We have included an example below:
"We will distribute these passes to our users via email and they will use the barcode on the pass to scan and accrue loyalty points every time they make a purchase at one of our venues. Users will also be able to scan and redeem any rewards they are entitled to. The pass will include Customer Name and Program Name as we have multiple loyalty programs that we support and we will include appropriate branding."
-
Once complete, you are then able to submit the request and move onto the second step in the process.
Submitting Additional Information for Approval
Once the access request has been submitted, you will receive an email from Google advising that some additional information is required. The email will look like this:

As you can see, the majority of the information required will already have been included in your publishing request, so the key additional things to add will be:
-
A screen shot of the front of the Pass when added to a user's wallet (Pass view)
-
A screen shot of the back of the pass when added to a user's wallet (Details view)
-
Screen shots of the 'add to wallet' button from the email sent to the user and/or the Balance Widget (this is for Google to verify that the correct button with the correct dimensions is being used);
This process can take 2-3 working days but once Google have approved the request then you will be able to start inviting your users to add their Loyalty cards to their wallets.